


| Sub-menu |
|---|
| HDMI |
| Displayport |
| Type C |
VG3457CV: Difference between revisions
From ViewSonic Documentation
// via Wikitext Extension for VSCode |
Marked this version for translation |
||
| Line 1: | Line 1: | ||
{{Print}} | {{Print}} | ||
=<translate> Introduction</translate>= | =<translate> <!--T:1--> Introduction</translate>= | ||
==<translate> Package Contents</translate>== | ==<translate> <!--T:2--> Package Contents</translate>== | ||
<ol style="list-style-type:square;"> | <ol style="list-style-type:square;"> | ||
<li><translate> Monitor</translate></li> | <li><translate> <!--T:3--> Monitor</translate></li> | ||
<li><translate> Power Cord</translate></li> | <li><translate> <!--T:4--> Power Cord</translate></li> | ||
<li><translate> Video Cable</translate></li> | <li><translate> <!--T:5--> Video Cable</translate></li> | ||
<li><translate> USB 2-in-1 Cable</translate></li> | <li><translate> <!--T:6--> USB 2-in-1 Cable</translate></li> | ||
<li><translate> Quick Start Guide</translate></li> | <li><translate> <!--T:7--> Quick Start Guide</translate></li> | ||
</ol> | </ol> | ||
{{Note|<translate> The cables included in your package may vary depending on your country. Please contact your local reseller for more information.</translate>}} | {{Note|<translate> <!--T:8--> The cables included in your package may vary depending on your country. Please contact your local reseller for more information.</translate>}} | ||
==<translate> Product Overview</translate>== | ==<translate> <!--T:9--> Product Overview</translate>== | ||
<gallery widths="400" heights="400" mode="nolines"> | <gallery widths="400" heights="400" mode="nolines"> | ||
File:VG3457CV_Front_View.png|<translate> Front View</translate>|<div style="font-style:normal; text-align:center"><translate> Front View</translate></div> | File:VG3457CV_Front_View.png|<translate> <!--T:10--> Front View</translate>|<div style="font-style:normal; text-align:center"><translate> <!--T:11--> Front View</translate></div> | ||
File:VG3457CV_Rear_View.png|<translate> Rear View</translate>|<div style="font-style:normal; text-align:center"><translate> Rear View</translate></div> | File:VG3457CV_Rear_View.png|<translate> <!--T:12--> Rear View</translate>|<div style="font-style:normal; text-align:center"><translate> <!--T:13--> Rear View</translate></div> | ||
</gallery> | </gallery> | ||
==<translate> I/O Ports</translate>== | ==<translate> <!--T:14--> I/O Ports</translate>== | ||
<div class="res-img">[[File:VG3457CV_IO.png|700px|alt=I/O ports|<translate> VG3457CV's I/O Ports</translate>]]</div> | <div class="res-img">[[File:VG3457CV_IO.png|700px|alt=I/O ports|<translate> <!--T:15--> VG3457CV's I/O Ports</translate>]]</div> | ||
{| class="wikitable" style="text-align:center; width:50%; background-color:#ffffff;" | {| class="wikitable" style="text-align:center; width:50%; background-color:#ffffff;" | ||
! style="background-color:#DB0025; color:#ffffff; width:20%;" | <translate> Number</translate> !! style="background-color:#DB0025; color:#ffffff;" | <translate> Description</translate> | ! style="background-color:#DB0025; color:#ffffff; width:20%;" | <translate> <!--T:16--> Number</translate> !! style="background-color:#DB0025; color:#ffffff;" | <translate> <!--T:17--> Description</translate> | ||
|- | |- | ||
|'''1''' || <translate> AC IN</translate> | |'''1''' || <translate> <!--T:18--> AC IN</translate> | ||
|- | |- | ||
|'''2''' || <translate> HDMI</translate> | |'''2''' || <translate> <!--T:19--> HDMI</translate> | ||
|- | |- | ||
|'''3''' || <translate> DisplayPort</translate> | |'''3''' || <translate> <!--T:20--> DisplayPort</translate> | ||
|- | |- | ||
|'''4''' || <translate> USB Type C</translate> | |'''4''' || <translate> <!--T:21--> USB Type C</translate> | ||
|- | |- | ||
|'''5''' || <translate> LAN</translate> | |'''5''' || <translate> <!--T:22--> LAN</translate> | ||
|- | |- | ||
|'''6''' || <translate> USB Downstream</translate> | |'''6''' || <translate> <!--T:23--> USB Downstream</translate> | ||
|} | |} | ||
{{Note|<translate> For more information about the</translate> '''1/2/3/4/5''' <translate> key and its functions, refer to</translate> [[#Hot_Keys|<translate> Hot Keys</translate>]].}} | {{Note|<translate> <!--T:24--> For more information about the</translate> '''1/2/3/4/5''' <translate> <!--T:25--> key and its functions, refer to</translate> [[#Hot_Keys|<translate> <!--T:26--> Hot Keys</translate>]].}} | ||
=<translate> Initial Setup</translate>= | =<translate> <!--T:27--> Initial Setup</translate>= | ||
==<translate> Installing the Stand</translate>== | ==<translate> <!--T:28--> Installing the Stand</translate>== | ||
<div class="res-img">[[File:VG3457CV_Stand_Installation.png|550px|alt=The installation of the monitor's stand|<translate> Stand Installation</translate>]]</div> | <div class="res-img">[[File:VG3457CV_Stand_Installation.png|550px|alt=The installation of the monitor's stand|<translate> <!--T:29--> Stand Installation</translate>]]</div> | ||
<ol> | <ol> | ||
<li><translate> Place the box on a flat, stable surface and open the front flap of the box to reveal the contents. Remove the top tray.</translate></li> | <li><translate> <!--T:30--> Place the box on a flat, stable surface and open the front flap of the box to reveal the contents. Remove the top tray.</translate></li> | ||
<li><translate> Remove the monitor stand’s base and neck. Align and connect the two points on the monitor stand’s base with the monitor stand’s neck.</translate></li> | <li><translate> <!--T:31--> Remove the monitor stand’s base and neck. Align and connect the two points on the monitor stand’s base with the monitor stand’s neck.</translate></li> | ||
<li><translate> Use the captured screw in the monitor stand’s base and secure it to the monitor stand’s neck.</translate></li> | <li><translate> <!--T:32--> Use the captured screw in the monitor stand’s base and secure it to the monitor stand’s neck.</translate></li> | ||
<li><translate> Align and slide the upper hooks of the monitor stand into the stand mounting slots.</translate>{{Note|<translate> Make sure the stand is secure and the quick release tab positively clicks into place.</translate>}}</li> | <li><translate> <!--T:33--> Align and slide the upper hooks of the monitor stand into the stand mounting slots.</translate>{{Note|<translate> <!--T:34--> Make sure the stand is secure and the quick release tab positively clicks into place.</translate>}}</li> | ||
<li><translate> Using the stand’s handle, lift the monitor out of the box and into its upright position on a flat, stable surface.</translate></li></ol> | <li><translate> <!--T:35--> Using the stand’s handle, lift the monitor out of the box and into its upright position on a flat, stable surface.</translate></li></ol> | ||
{{Note|<translate> For safety and to ensure optimal performance, please position the monitor on a flat, stable surface. Failure to do so may lead to the monitor falling, causing damage to the monitor itself and/or posing a risk of personal injury.</translate>}} | {{Note|<translate> <!--T:36--> For safety and to ensure optimal performance, please position the monitor on a flat, stable surface. Failure to do so may lead to the monitor falling, causing damage to the monitor itself and/or posing a risk of personal injury.</translate>}} | ||
==<translate> Removing the Stand and Mounting the Monitor</translate>== | ==<translate> <!--T:37--> Removing the Stand and Mounting the Monitor</translate>== | ||
<translate> Refer to the table below for the standard dimensions for mounting kits.</translate> | <translate> <!--T:38--> Refer to the table below for the standard dimensions for mounting kits.</translate> | ||
{{Note|<translate> For use only with a UL certified mounting kit/bracket. To obtain a wall mounting kit or height adjustment base, contact ViewSonic® or your local dealer.</translate>}} | {{Note|<translate> <!--T:39--> For use only with a UL certified mounting kit/bracket. To obtain a wall mounting kit or height adjustment base, contact ViewSonic® or your local dealer.</translate>}} | ||
{| class="wikitable" style="text-align: center; width:60%; background-color:#ffffff;" | {| class="wikitable" style="text-align: center; width:60%; background-color:#ffffff;" | ||
! style="background-color:#DB0025; color:#ffffff;" | <translate> Maximum Loading</translate> | ! style="background-color:#DB0025; color:#ffffff;" | <translate> <!--T:40--> Maximum Loading</translate> | ||
! style="background-color:#DB0025; color:#ffffff;" | <translate> Pad Patten<br>(W x H)</translate> | ! style="background-color:#DB0025; color:#ffffff;" | <translate> <!--T:41--> Pad Patten<br>(W x H)</translate> | ||
! style="background-color:#DB0025; color:#ffffff;" | <translate> Pad Hole</translate> | ! style="background-color:#DB0025; color:#ffffff;" | <translate> <!--T:42--> Pad Hole</translate> | ||
! style="background-color:#DB0025; color:#ffffff;" | <translate> Screw Specification</translate> | ! style="background-color:#DB0025; color:#ffffff;" | <translate> <!--T:43--> Screw Specification</translate> | ||
! style="background-color:#DB0025; color:#ffffff;" | <translate> Screw Quantity</translate> | ! style="background-color:#DB0025; color:#ffffff;" | <translate> <!--T:44--> Screw Quantity</translate> | ||
|- | |- | ||
|<translate> 14 kg</translate> | |<translate> <!--T:45--> 14 kg</translate> | ||
|<translate> 100 x 100 mm</translate> | |<translate> <!--T:46--> 100 x 100 mm</translate> | ||
|<translate> Ø 5 mm</translate> | |<translate> <!--T:47--> Ø 5 mm</translate> | ||
|<translate> M4 x 10 mm</translate> | |<translate> <!--T:48--> M4 x 10 mm</translate> | ||
|<translate> 4 screws</translate> | |<translate> <!--T:49--> 4 screws</translate> | ||
|} | |} | ||
{{Note|<translate> Mounting kits are sold separately.</translate>}} | {{Note|<translate> <!--T:50--> Mounting kits are sold separately.</translate>}} | ||
<td><div class="res-img">[[File:VG3457CV_Stand_Disassembly.png|550px|alt= the preparation of the monitor for the wall mounting |<translate> Stand Disassembly</translate>]]</div> | <td><div class="res-img">[[File:VG3457CV_Stand_Disassembly.png|550px|alt= the preparation of the monitor for the wall mounting |<translate> <!--T:51--> Stand Disassembly</translate>]]</div> | ||
{{Important|<translate> Before removing the stand, please turn off the monitor, disconnect all cables, and place the monitor on a flat, stable surface with the screen facing down.</translate>}} | {{Important|<translate> <!--T:52--> Before removing the stand, please turn off the monitor, disconnect all cables, and place the monitor on a flat, stable surface with the screen facing down.</translate>}} | ||
<ol> | <ol> | ||
<li><translate> Press and hold the quick release tab and carefully lift the stand.</translate></li> | <li><translate> <!--T:53--> Press and hold the quick release tab and carefully lift the stand.</translate></li> | ||
<li><translate> Pull down slightly to disengage the hooks and remove the stand.</translate></li> | <li><translate> <!--T:54--> Pull down slightly to disengage the hooks and remove the stand.</translate></li> | ||
<li><translate> Attach the mounting bracket to the VESA mounting holes at the rear of the monitor. Then secure it with four screws (M4 x 10 mm).</translate></li> | <li><translate> <!--T:55--> Attach the mounting bracket to the VESA mounting holes at the rear of the monitor. Then secure it with four screws (M4 x 10 mm).</translate></li> | ||
<li><translate> Follow the instructions that come with the purchased mounting kit to mount the monitor.</translate></li> | <li><translate> <!--T:56--> Follow the instructions that come with the purchased mounting kit to mount the monitor.</translate></li> | ||
</ol> | </ol> | ||
==<translate> Using the Security Slot</translate>== | ==<translate> <!--T:57--> Using the Security Slot</translate>== | ||
<div class="res-img">[[File:VG3457CV_Security_Slot.png|500px|alt=the mounting slots|<translate> Using the security slot</translate>]]</div> | <div class="res-img">[[File:VG3457CV_Security_Slot.png|500px|alt=the mounting slots|<translate> <!--T:58--> Using the security slot</translate>]]</div> | ||
<translate> To help prevent the monitor from being stolen, use a security slot locking device to secure the monitor to a fixed object.</translate> | <translate> <!--T:59--> To help prevent the monitor from being stolen, use a security slot locking device to secure the monitor to a fixed object.</translate> | ||
<translate> Additionally, fastening the monitor to a wall or fixed object using a security cable can help support the weight of the monitor in order to prevent the monitor from falling over.</translate> | <translate> <!--T:60--> Additionally, fastening the monitor to a wall or fixed object using a security cable can help support the weight of the monitor in order to prevent the monitor from falling over.</translate> | ||
=<translate> Making Connections</translate>= | =<translate> <!--T:61--> Making Connections</translate>= | ||
==<translate> Connecting to Power</translate>== | ==<translate> <!--T:62--> Connecting to Power</translate>== | ||
<div class="res-img">[[File:VG3457CV_Connect_Power.png|400px|alt=the location of the AC IN jack|<translate> Connecting to power</translate>]]</div> | <div class="res-img">[[File:VG3457CV_Connect_Power.png|400px|alt=the location of the AC IN jack|<translate> <!--T:63--> Connecting to power</translate>]]</div> | ||
<ol><li><translate> Connect the power cord to the '''AC IN''' jack at the rear of the monitor.</translate></li> | <ol><li><translate> <!--T:64--> Connect the power cord to the '''AC IN''' jack at the rear of the monitor.</translate></li> | ||
<li><translate> Plug the power cord plug into a power outlet.</translate></li></ol> | <li><translate> <!--T:65--> Plug the power cord plug into a power outlet.</translate></li></ol> | ||
==<translate> Display Connection</translate>== | ==<translate> <!--T:66--> Display Connection</translate>== | ||
===<translate> HDMI</translate>=== | ===<translate> <!--T:67--> HDMI</translate>=== | ||
<div class="res-img">[[File:VG3457CV_Connect_HDMI.png|450px|alt=the location of the HDMI port|<translate> Connecting through HDMI</translate>]]</div> | <div class="res-img">[[File:VG3457CV_Connect_HDMI.png|450px|alt=the location of the HDMI port|<translate> <!--T:68--> Connecting through HDMI</translate>]]</div> | ||
<ol><li><translate> Connect one end of an HDMI cable to an '''HDMI''' port of the monitor.</translate></li> | <ol><li><translate> <!--T:69--> Connect one end of an HDMI cable to an '''HDMI''' port of the monitor.</translate></li> | ||
<li><translate> Plug the other end of the cable into the HDMI port of your computer.</translate></li></ol> | <li><translate> <!--T:70--> Plug the other end of the cable into the HDMI port of your computer.</translate></li></ol> | ||
===<translate> DisplayPort</translate>=== | ===<translate> <!--T:71--> DisplayPort</translate>=== | ||
<div class="res-img">[[File:VG3457CV_Connect_DP.png|420px|alt= the location of the DP port|<translate> Connecting through DisplayPort</translate>]]</div> | <div class="res-img">[[File:VG3457CV_Connect_DP.png|420px|alt= the location of the DP port|<translate> <!--T:72--> Connecting through DisplayPort</translate>]]</div> | ||
<ol><li><translate> Connect one end of a DisplayPort cable to the '''DP''' port of the monitor.</translate></li> | <ol><li><translate> <!--T:73--> Connect one end of a DisplayPort cable to the '''DP''' port of the monitor.</translate></li> | ||
<li><translate> Plug the other end of the cable into the DisplayPort or Mini DisplayPort port of your computer.</translate></li></ol> | <li><translate> <!--T:74--> Plug the other end of the cable into the DisplayPort or Mini DisplayPort port of your computer.</translate></li></ol> | ||
{{Note|<translate> To connect the monitor to the Thunderbolt port (v. 1 & 2) on your Mac, connect the Mini DisplayPort end of a “Mini DisplayPort to DisplayPort cable” to the Thunderbolt output port of your Mac. Then connect the other end of the cable to the DisplayPort port of the monitor.</translate>}} | {{Note|<translate> <!--T:75--> To connect the monitor to the Thunderbolt port (v. 1 & 2) on your Mac, connect the Mini DisplayPort end of a “Mini DisplayPort to DisplayPort cable” to the Thunderbolt output port of your Mac. Then connect the other end of the cable to the DisplayPort port of the monitor.</translate>}} | ||
===<translate> Type C</translate>=== | ===<translate> <!--T:76--> Type C</translate>=== | ||
<div class="res-img">[[File:VG3457CV_Connect_Type_C.png|450px|alt=the location of the USB Type C port|<translate> Connecting through USB Type C</translate>]]</div> | <div class="res-img">[[File:VG3457CV_Connect_Type_C.png|450px|alt=the location of the USB Type C port|<translate> <!--T:77--> Connecting through USB Type C</translate>]]</div> | ||
<ol><li><translate> Connect one end of a USB Type C cable to the rear upstream '''USB Type C''' port of the monitor.</translate></li> | <ol><li><translate> <!--T:78--> Connect one end of a USB Type C cable to the rear upstream '''USB Type C''' port of the monitor.</translate></li> | ||
<li><translate> Plug the other end of the cable into the full-featured USB port of your computer.</translate></li></ol> | <li><translate> <!--T:79--> Plug the other end of the cable into the full-featured USB port of your computer.</translate></li></ol> | ||
{{Note|<translate> | {{Note|<translate> | ||
<!--T:80--> | |||
:*For video output use, make sure your USB Type C output device (e.g., laptop) and cable support video signal transmission. | :*For video output use, make sure your USB Type C output device (e.g., laptop) and cable support video signal transmission. | ||
:*When you use Type C as the video signal input source, it is recommended to unplug the DisplayPort and HDMI signals to avoid audio output confusion. | :*When you use Type C as the video signal input source, it is recommended to unplug the DisplayPort and HDMI signals to avoid audio output confusion. | ||
</translate>}} | </translate>}} | ||
==<translate> USB Connection</translate>== | ==<translate> <!--T:81--> USB Connection</translate>== | ||
<translate> The monitor supports two types of USB ports, upstream and downstream. When making connection(s), observe the following guideline.</translate> | <translate> <!--T:82--> The monitor supports two types of USB ports, upstream and downstream. When making connection(s), observe the following guideline.</translate> | ||
<div class="res-img">[[File:VG3457CV_Connect_USB.png|500px|alt=the location of the USB ports|<translate> Connecting the VP27786a-4K to your PC via the upstream/downstream USB ports</translate>]]</div> | <div class="res-img">[[File:VG3457CV_Connect_USB.png|500px|alt=the location of the USB ports|<translate> <!--T:83--> Connecting the VP27786a-4K to your PC via the upstream/downstream USB ports</translate>]]</div> | ||
{| class="wikitable" style=" text-align: center; width: 60%; background-color:#ffffff;" | {| class="wikitable" style=" text-align: center; width: 60%; background-color:#ffffff;" | ||
! style="background-color:#DB0025; color:#ffffff;" colspan="2" |<translate> USB Type</translate> | ! style="background-color:#DB0025; color:#ffffff;" colspan="2" |<translate> <!--T:84--> USB Type</translate> | ||
! style="background-color:#DB0025; color:#ffffff;" | <translate> Connection Type</translate> | ! style="background-color:#DB0025; color:#ffffff;" | <translate> <!--T:85--> Connection Type</translate> | ||
! style="background-color:#DB0025; color:#ffffff;" | <translate> Description</translate> | ! style="background-color:#DB0025; color:#ffffff;" | <translate> <!--T:86--> Description</translate> | ||
|- | |- | ||
| rowspan="2" style="background-color:#ffffff;" | [[File:Number1.svg|25px|alt= 1|link=|<translate> No. 1</translate>]] | | rowspan="2" style="background-color:#ffffff;" | [[File:Number1.svg|25px|alt= 1|link=|<translate> <!--T:87--> No. 1</translate>]] | ||
| rowspan="2" style="background-color:#ffffff;" |'''<translate> Upstream</translate>''' | | rowspan="2" style="background-color:#ffffff;" |'''<translate> <!--T:88--> Upstream</translate>''' | ||
| rowspan="2" style="background-color:#ffffff;" |<translate> Type C</translate> | | rowspan="2" style="background-color:#ffffff;" |<translate> <!--T:89--> Type C</translate> | ||
| style="background-color:#ffffff; text-align:left;"| <translate> Full-featured port: transfers data, audio, video, and power.</translate> | | style="background-color:#ffffff; text-align:left;"| <translate> <!--T:90--> Full-featured port: transfers data, audio, video, and power.</translate> | ||
|- | |- | ||
| style="text-align:left;" | <translate>Supports: 5V/3A, 9V/3A, 12V/3A, 15V/3A, 20V/4.9A (LPS) charging.</translate> | | style="text-align:left;" | <translate><!--T:91--> Supports: 5V/3A, 9V/3A, 12V/3A, 15V/3A, 20V/4.9A (LPS) charging.</translate> | ||
|- | |- | ||
| rowspan="2" style="background-color:#ffffff;" | [[File:Number2.svg|25px|alt= 2|link=|<translate> No. 2</translate>]] | | rowspan="2" style="background-color:#ffffff;" | [[File:Number2.svg|25px|alt= 2|link=|<translate> <!--T:92--> No. 2</translate>]] | ||
| rowspan="4" style="background-color:#ffffff;" |'''<translate> Downstream</translate>''' | | rowspan="4" style="background-color:#ffffff;" |'''<translate> <!--T:93--> Downstream</translate>''' | ||
| rowspan="2" style="background-color:#ffffff;" |<translate> Type A</translate> | | rowspan="2" style="background-color:#ffffff;" |<translate> <!--T:94--> Type A</translate> | ||
| style="background-color:#ffffff; text-align:left;" |<translate> For peripheral device(s) (e.g., storage device, keyboard, mouse, etc.). </translate> | | style="background-color:#ffffff; text-align:left;" |<translate> <!--T:95--> For peripheral device(s) (e.g., storage device, keyboard, mouse, etc.). </translate> | ||
|- | |- | ||
| style="text-align:left; background-color:#ffffff;" | <translate> Supports: 5V/2.1A charging and BC 1.2.</translate> | | style="text-align:left; background-color:#ffffff;" | <translate> <!--T:96--> Supports: 5V/2.1A charging and BC 1.2.</translate> | ||
|- | |- | ||
| rowspan="2" style="background-color:#ffffff;" |[[File:Number3.svg|25px|alt= 3|link=|<translate> No. 3</translate>]] | | rowspan="2" style="background-color:#ffffff;" |[[File:Number3.svg|25px|alt= 3|link=|<translate> <!--T:97--> No. 3</translate>]] | ||
| rowspan="2" style="background-color:#ffffff;" |<translate> Type C</translate> | | rowspan="2" style="background-color:#ffffff;" |<translate> <!--T:98--> Type C</translate> | ||
| style="background-color:#ffffff; text-align:left;" |<translate> For peripheral device(s) (e.g., storage device, keyboard, mouse, etc.).</translate> | | style="background-color:#ffffff; text-align:left;" |<translate> <!--T:99--> For peripheral device(s) (e.g., storage device, keyboard, mouse, etc.).</translate> | ||
|- | |- | ||
| style="background-color:#ffffff; text-align:left;" |<translate> Supports 5V/3A charging.</translate> | | style="background-color:#ffffff; text-align:left;" |<translate> <!--T:100--> Supports 5V/3A charging.</translate> | ||
|} | |} | ||
{{Note|<translate> | {{Note|<translate> | ||
<!--T:101--> | |||
:*For video output use, make sure your USB Type C output device (e.g., laptop) and cable support video signal transmission.</translate> | :*For video output use, make sure your USB Type C output device (e.g., laptop) and cable support video signal transmission.</translate> | ||
<translate>:*When you use Type C as the video signal input source, it is recommended to unplug the DisplayPort and HDMI cables to avoid audio output confusion. | <translate><!--T:102--> | ||
:*When you use Type C as the video signal input source, it is recommended to unplug the DisplayPort and HDMI cables to avoid audio output confusion. | |||
</translate>}} | </translate>}} | ||
===<translate> Using the USB Ports</translate>=== | ===<translate> <!--T:103--> Using the USB Ports</translate>=== | ||
<div class="res-img">[[File:VG3457CV_Upstream_Downstream-1.png|500px|alt=the location of the USB ports and the connection detail|<translate> Using the USB downstream ports</translate>]]</div> | <div class="res-img">[[File:VG3457CV_Upstream_Downstream-1.png|500px|alt=the location of the USB ports and the connection detail|<translate> <!--T:104--> Using the USB downstream ports</translate>]]</div> | ||
<ol><li><translate> To use the downstream USB ports, connect one end of the USB Type C cable to the upstream '''USB Type C''' <span style="font-size:28px; color:#DB0025;">❶</span> port of the monitor. Plug the other end of the cable into a USB port of your computer.</translate></li> | <ol><li><translate> <!--T:105--> To use the downstream USB ports, connect one end of the USB Type C cable to the upstream '''USB Type C''' <span style="font-size:28px; color:#DB0025;">❶</span> port of the monitor. Plug the other end of the cable into a USB port of your computer.</translate></li> | ||
<li><translate> Connect your peripheral device(s) to a downstream USB port (Type A <span style="font-size:28px; color:#DB0025;">❷</span> ) or (Type C <span style="font-size:28px; color:#DB0025;">❸</span> ) of the monitor.</translate></li></ol> | <li><translate> <!--T:106--> Connect your peripheral device(s) to a downstream USB port (Type A <span style="font-size:28px; color:#DB0025;">❷</span> ) or (Type C <span style="font-size:28px; color:#DB0025;">❸</span> ) of the monitor.</translate></li></ol> | ||
<br><p><translate> If you are required to connect through either HDMI or DisplayPort, please also use a USB Type C to USB Type A cable to connect to the monitor to enable data transfer.</translate></p> | <br><p><translate> <!--T:107--> If you are required to connect through either HDMI or DisplayPort, please also use a USB Type C to USB Type A cable to connect to the monitor to enable data transfer.</translate></p> | ||
<div class="res-img">[[File:VG3457CV_Upstream_Downstream-2.png|450px|alt=the location of the USB Type C, HDMI, and DP ports|<translate> HDMI or DP connection </translate>]]</div> | <div class="res-img">[[File:VG3457CV_Upstream_Downstream-2.png|450px|alt=the location of the USB Type C, HDMI, and DP ports|<translate> <!--T:108--> HDMI or DP connection </translate>]]</div> | ||
==<translate> Ethernet Connection</translate>== | ==<translate> <!--T:109--> Ethernet Connection</translate>== | ||
<div class="res-img">[[File:VG3457CV_Connect_Ethernet.png|450px|alt=the location of the LAN port|<translate> Connecting to Ethernet</translate>]]</div><br /> | <div class="res-img">[[File:VG3457CV_Connect_Ethernet.png|450px|alt=the location of the LAN port|<translate> <!--T:110--> Connecting to Ethernet</translate>]]</div><br /> | ||
<ol><li><translate> Connect one end of your LAN (RJ45) cable to the LAN (RJ45) port of the monitor.</translate></li> | <ol><li><translate> <!--T:111--> Connect one end of your LAN (RJ45) cable to the LAN (RJ45) port of the monitor.</translate></li> | ||
<li><translate> Plug the other end into your network modem or port.</translate></li> | <li><translate> <!--T:112--> Plug the other end into your network modem or port.</translate></li> | ||
<li><translate> Ensure your computer is also connected to the monitor by the rear upstream USB Type C port of the monitor. See [[#USB Connection| USB Connection ]] for more information.</translate></li></ol> | <li><translate> <!--T:113--> Ensure your computer is also connected to the monitor by the rear upstream USB Type C port of the monitor. See [[#USB Connection| USB Connection ]] for more information.</translate></li></ol> | ||
<br> | <br> | ||
<u>'''<translate>Ethernet Connection When Using USB Type C for Video Input</translate>'''</u> | <u>'''<translate><!--T:114--> Ethernet Connection When Using USB Type C for Video Input</translate>'''</u> | ||
<translate>No further steps are required. If needed, see [[#USB Connection|USB Connection]] for more information.</translate> | <translate><!--T:115--> No further steps are required. If needed, see [[#USB Connection|USB Connection]] for more information.</translate> | ||
<p><u>'''<translate>Ethernet Connection When Using DisplayPort or HDMI for Video Input</translate>'''</u></p> | <p><u>'''<translate><!--T:116--> Ethernet Connection When Using DisplayPort or HDMI for Video Input</translate>'''</u></p> | ||
<translate>In addition to the DisplayPort or HDMI connection, please also connect your computer to the rear upstream USB Type C port of the monitor to enable data transmission. See [[#Using the USB Ports| Using the USB Ports ]] for more information.</translate> | <translate><!--T:117--> In addition to the DisplayPort or HDMI connection, please also connect your computer to the rear upstream USB Type C port of the monitor to enable data transmission. See [[#Using the USB Ports| Using the USB Ports ]] for more information.</translate> | ||
{| class="wikitable" style=" text-align: center; width: 60%; background-color:#ffffff;" | {| class="wikitable" style=" text-align: center; width: 60%; background-color:#ffffff;" | ||
! style="background-color:#DB0025; color:#ffffff;" colspan="2" |<translate> Active Mode</translate> | ! style="background-color:#DB0025; color:#ffffff;" colspan="2" |<translate> <!--T:118--> Active Mode</translate> | ||
! style="background-color:#DB0025; color:#ffffff;" | <translate> Left LED</translate> | ! style="background-color:#DB0025; color:#ffffff;" | <translate> <!--T:119--> Left LED</translate> | ||
! style="background-color:#DB0025; color:#ffffff;" | <translate> Right LED</translate> | ! style="background-color:#DB0025; color:#ffffff;" | <translate> <!--T:120--> Right LED</translate> | ||
|- | |- | ||
| rowspan="3" style="background-color:#ffffff;" | [[File:VG3457CV_LAN_Port.png|100px|alt=|link=|<translate> LAN Port</translate>]] | | rowspan="3" style="background-color:#ffffff;" | [[File:VG3457CV_LAN_Port.png|100px|alt=|link=|<translate> <!--T:121--> LAN Port</translate>]] | ||
| style="background-color:#ffffff;" |<translate> 1GB Bit</translate> | | style="background-color:#ffffff;" |<translate> <!--T:122--> 1GB Bit</translate> | ||
| style="background-color:#ffffff;" |<translate> Off</translate> | | style="background-color:#ffffff;" |<translate> <!--T:123--> Off</translate> | ||
| style="background-color:#ffffff; "| <translate> Flashing Amber</translate> | | style="background-color:#ffffff; "| <translate> <!--T:124--> Flashing Amber</translate> | ||
|- | |- | ||
| style="background-color:#ffffff;" |<translate> 100M Bit</translate> | | style="background-color:#ffffff;" |<translate> <!--T:125--> 100M Bit</translate> | ||
| style="background-color:#ffffff;" |<translate> Flashing Green</translate> | | style="background-color:#ffffff;" |<translate> <!--T:126--> Flashing Green</translate> | ||
| style="background-color:#ffffff;" |<translate> Off</translate> | | style="background-color:#ffffff;" |<translate> <!--T:127--> Off</translate> | ||
|- | |- | ||
|<translate> 10M Bit</translate> | |<translate> <!--T:128--> 10M Bit</translate> | ||
|<translate> Off</translate> | |<translate> <!--T:129--> Off</translate> | ||
| style="background-color:#ffffff;" | <translate> Off</translate> | | style="background-color:#ffffff;" | <translate> <!--T:130--> Off</translate> | ||
|} | |} | ||
==<translate> Audio Connection</translate>== | ==<translate> <!--T:131--> Audio Connection</translate>== | ||
<div class="res-img">[[File:VG3457CV_Connect_Audio.png|450px|alt=the location of the audio jack|<translate> Connecting to audio</translate>]]</div><br /> | <div class="res-img">[[File:VG3457CV_Connect_Audio.png|450px|alt=the location of the audio jack|<translate> <!--T:132--> Connecting to audio</translate>]]</div><br /> | ||
<translate> Plug the audio jack of the audio device into the '''Audio Out''' port of the monitor.</translate> | <translate> <!--T:133--> Plug the audio jack of the audio device into the '''Audio Out''' port of the monitor.</translate> | ||
{{Note|<translate> The monitor is also equipped with dual speakers.</translate>}} | {{Note|<translate> <!--T:134--> The monitor is also equipped with dual speakers.</translate>}} | ||
<translate>There are two audio output sources when connected to USB upstream. Users can choose according to their preference.</translate> | <translate><!--T:135--> There are two audio output sources when connected to USB upstream. Users can choose according to their preference.</translate> | ||
{| class="wikitable" style=" text-align: center; width: 60%; background-color:#ffffff;" | {| class="wikitable" style=" text-align: center; width: 60%; background-color:#ffffff;" | ||
! style="background-color:#DB0025; color:#ffffff;" |<translate> Audio Output Source</translate> | ! style="background-color:#DB0025; color:#ffffff;" |<translate> <!--T:136--> Audio Output Source</translate> | ||
! style="background-color:#DB0025; color:#ffffff;" | <translate> Description</translate> | ! style="background-color:#DB0025; color:#ffffff;" | <translate> <!--T:137--> Description</translate> | ||
|- | |- | ||
| style="background-color:#ffffff;" | <translate> Echo Cancelling Speakerphone<br>(Windows OS)</translate> | | style="background-color:#ffffff;" | <translate> <!--T:138--> Echo Cancelling Speakerphone<br>(Windows OS)</translate> | ||
| rowspan="2" style="background-color:#ffffff;" |<translate> Monitor and operating system volume controls can be synchronized.</translate> | | rowspan="2" style="background-color:#ffffff;" |<translate> <!--T:139--> Monitor and operating system volume controls can be synchronized.</translate> | ||
|- | |- | ||
|<translate> USB (macOS)</translate> | |<translate> <!--T:140--> USB (macOS)</translate> | ||
|- | |- | ||
|<translate> HD Audio Driver for Display Audio<br>(Windows OS)</translate> | |<translate> <!--T:141--> HD Audio Driver for Display Audio<br>(Windows OS)</translate> | ||
| rowspan="2" |<translate> The volume of the monitor and operating system are controlled independently.</translate> | | rowspan="2" |<translate> <!--T:142--> The volume of the monitor and operating system are controlled independently.</translate> | ||
|- | |- | ||
|<translate> HDMI or DisplayPort<br>(macOS) </translate> | |<translate> <!--T:143--> HDMI or DisplayPort<br>(macOS) </translate> | ||
|} | |} | ||
=<translate> Using the Monitor</translate>= | =<translate> <!--T:144--> Using the Monitor</translate>= | ||
==<translate> Adjusting the Viewing Angle</translate>== | ==<translate> <!--T:145--> Adjusting the Viewing Angle</translate>== | ||
===<translate> Height Adjustment</translate>=== | ===<translate> <!--T:146--> Height Adjustment</translate>=== | ||
<div class="res-img">[[File:VG3457CV_Adjust_Height.png|400px|alt=slide upward or downward|<translate> Adjusting the height</translate>]]</div><br /> | <div class="res-img">[[File:VG3457CV_Adjust_Height.png|400px|alt=slide upward or downward|<translate> <!--T:147--> Adjusting the height</translate>]]</div><br /> | ||
<translate> Lower or raise the monitor to the desired height (0 to 110 mm).</translate> | <translate> <!--T:148--> Lower or raise the monitor to the desired height (0 to 110 mm).</translate> | ||
{{Note|<translate> When adjusting, press down firmly along the adjustment track.</translate>}} | {{Note|<translate> <!--T:149--> When adjusting, press down firmly along the adjustment track.</translate>}} | ||
===<translate> Swivel Adjustment</translate>=== | ===<translate> <!--T:150--> Swivel Adjustment</translate>=== | ||
<div class="res-img">[[File:VG3457CV_Adjust_Swivel.png|450px|alt=swivel to the left or right|<translate> Swivel adjustment</translate>]]</div><br /> | <div class="res-img">[[File:VG3457CV_Adjust_Swivel.png|450px|alt=swivel to the left or right|<translate> <!--T:151--> Swivel adjustment</translate>]]</div><br /> | ||
<translate> Swivel the monitor to the left or right for the desired viewing angle (± 60˚).</translate> | <translate> <!--T:152--> Swivel the monitor to the left or right for the desired viewing angle (± 60˚).</translate> | ||
===<translate> Tilt Adjustment</translate>=== | ===<translate> <!--T:153--> Tilt Adjustment</translate>=== | ||
<div class="res-img">[[File:VG3457CV_Adjust_Tilt.png|250px|alt=tile forward or backward|<translate> Adjusting the tilt</translate>]]</div><br /> | <div class="res-img">[[File:VG3457CV_Adjust_Tilt.png|250px|alt=tile forward or backward|<translate> <!--T:154--> Adjusting the tilt</translate>]]</div><br /> | ||
<translate> Tilt the monitor forwards or backwards to the desired viewing angle (-5˚ to 40˚).</translate> | <translate> <!--T:155--> Tilt the monitor forwards or backwards to the desired viewing angle (-5˚ to 40˚).</translate> | ||
{{Note| <translate> | {{Note| <translate> | ||
<!--T:156--> | |||
:*When adjusting, support the stand firmly with one hand while tilting the monitor forwards or backwards with the other hand. | :*When adjusting, support the stand firmly with one hand while tilting the monitor forwards or backwards with the other hand. | ||
:*The monitor must be lifted to the highest position, then it can support 40° tilt. | :*The monitor must be lifted to the highest position, then it can support 40° tilt. | ||
</translate>}} | </translate>}} | ||
==<translate> Turning the Monitor On/Off</translate>== | ==<translate> <!--T:157--> Turning the Monitor On/Off</translate>== | ||
<div class="res-img">[[File:VG3457CV_Power_Button.png|400px|alt=the location of the Power button|<translate> VP2786a-4K's Power Button is at the rear of the monitor, below the Joy Key</translate>]]</div> | <div class="res-img">[[File:VG3457CV_Power_Button.png|400px|alt=the location of the Power button|<translate> <!--T:158--> VP2786a-4K's Power Button is at the rear of the monitor, below the Joy Key</translate>]]</div> | ||
<ol><li><translate> Plug the connected power adapter into a power outlet.</translate></li> | <ol><li><translate> <!--T:159--> Plug the connected power adapter into a power outlet.</translate></li> | ||
<li><translate> Press the '''Power'''</translate> <i class='fas fa-power-off' style="font-size:22px;></i> <translate>button to turn on the monitor.</translate></li> | <li><translate> <!--T:160--> Press the '''Power'''</translate> <i class='fas fa-power-off' style="font-size:22px;></i> <translate><!--T:161--> button to turn on the monitor.</translate></li> | ||
<li><translate> To turn the monitor off, press the '''Power'''</translate> <i class='fas fa-power-off' style="font-size:22px;></i> <translate> button again.</translate></li></ol> | <li><translate> <!--T:162--> To turn the monitor off, press the '''Power'''</translate> <i class='fas fa-power-off' style="font-size:22px;></i> <translate> <!--T:163--> button again.</translate></li></ol> | ||
{{Note|<translate> The monitor will still consume some power as long as the power cord is connected to the power outlet. If the monitor is not being used for a long period of time, please disconnect the power plug from the power outlet.</translate>}} | {{Note|<translate> <!--T:164--> The monitor will still consume some power as long as the power cord is connected to the power outlet. If the monitor is not being used for a long period of time, please disconnect the power plug from the power outlet.</translate>}} | ||
==<translate> Using the Webcam</translate>== | ==<translate> <!--T:165--> Using the Webcam</translate>== | ||
<ul> | <ul> | ||
<li><translate> If Connected by DisplayPort or HDMI:</translate><br><translate>To activate the webcam, ensure the monitor is also connected to your computer via the USB upstream port.</translate> | <li><translate> <!--T:166--> If Connected by DisplayPort or HDMI:</translate><br><translate><!--T:167--> To activate the webcam, ensure the monitor is also connected to your computer via the USB upstream port.</translate> | ||
<div class="res-img">[[File:VG3457CV_Connect_Webcam_Through_DP_HDMI.png|500px|alt=the USB Type C connection|<translate> Webcam connection through DP or HDMI</translate>]]</div></li> | <div class="res-img">[[File:VG3457CV_Connect_Webcam_Through_DP_HDMI.png|500px|alt=the USB Type C connection|<translate> <!--T:168--> Webcam connection through DP or HDMI</translate>]]</div></li> | ||
<li><translate> If Connected by USB Type C:</translate><br><translate>The webcam will already be activated and ready for use.</translate></li> | <li><translate> <!--T:169--> If Connected by USB Type C:</translate><br><translate><!--T:170--> The webcam will already be activated and ready for use.</translate></li> | ||
</ul> | </ul> | ||
===<translate>Uncovering and Covering the Webcam (Privacy Mode)</translate>=== | ===<translate><!--T:171--> Uncovering and Covering the Webcam (Privacy Mode)</translate>=== | ||
<gallery widths="400" heights="400" mode="nolines"> | <gallery widths="400" heights="400" mode="nolines"> | ||
File:VG2757V-2K_Webcam_Uncover.png|<translate> Uncover the Webcam</translate>|<div style="font-style:normal; text-align:left;"><translate> '''Uncover'''</translate><br><translate>To pop-up and uncover the webcam, press the top of the webcam.</translate></div> | File:VG2757V-2K_Webcam_Uncover.png|<translate> <!--T:172--> Uncover the Webcam</translate>|<div style="font-style:normal; text-align:left;"><translate> <!--T:173--> '''Uncover'''</translate><br><translate><!--T:174--> To pop-up and uncover the webcam, press the top of the webcam.</translate></div> | ||
File:VG2757V-2K_Webcam_Cover.png|<translate> Cover the Webcam</translate>|<div style="font-style:normal; text-align:left;"><translate> '''Cover'''</translate><br><translate>To cover the webcam, press the top of the webcam.</translate></div> | File:VG2757V-2K_Webcam_Cover.png|<translate> <!--T:175--> Cover the Webcam</translate>|<div style="font-style:normal; text-align:left;"><translate> <!--T:176--> '''Cover'''</translate><br><translate><!--T:177--> To cover the webcam, press the top of the webcam.</translate></div> | ||
</gallery> | </gallery> | ||
===<translate>Using the Monitor’s Webcam for Windows Hello</translate>=== | ===<translate><!--T:178--> Using the Monitor’s Webcam for Windows Hello</translate>=== | ||
<translate>You can use Windows Hello facial recognition to sign-in with the monitor’s webcam. Please refer to [https://support.microsoft.com/en-us/windows/configure-windows-hello-dae28983-8242-bb2a-d3d1-87c9d265a5f0 Windows’ official website for Windows Hello settings]</translate>. | <translate><!--T:179--> You can use Windows Hello facial recognition to sign-in with the monitor’s webcam. Please refer to [https://support.microsoft.com/en-us/windows/configure-windows-hello-dae28983-8242-bb2a-d3d1-87c9d265a5f0 Windows’ official website for Windows Hello settings]</translate>. | ||
===<translate>Tilting the Webcam</translate>=== | ===<translate><!--T:180--> Tilting the Webcam</translate>=== | ||
<translate>When the webcam is uncovered, tilt it forwards or backwards to adjust the viewing angle (-5° to 5°).</translate> | <translate><!--T:181--> When the webcam is uncovered, tilt it forwards or backwards to adjust the viewing angle (-5° to 5°).</translate> | ||
<div class="res-img">[[File:VG2757V-2K_Webcam_Tilt.png|400px|alt=|tilt forward or backward<translate> Webcam's tilt angle </translate>]]</div> | <div class="res-img">[[File:VG2757V-2K_Webcam_Tilt.png|400px|alt=|tilt forward or backward<translate> <!--T:182--> Webcam's tilt angle </translate>]]</div> | ||
==<translate> Using the Control Panel Keys</translate>== | ==<translate> <!--T:183--> Using the Control Panel Keys</translate>== | ||
<translate> Use the '''Control Panel Keys (1/2/3/4/5)''' to adjust the ViewMode and LED Fill Light, mute the Speaker and Microphone, and navigate the On-Screen Display (OSD) Menu.</translate> | <translate> <!--T:184--> Use the '''Control Panel Keys (1/2/3/4/5)''' to adjust the ViewMode and LED Fill Light, mute the Speaker and Microphone, and navigate the On-Screen Display (OSD) Menu.</translate> | ||
<div class="res-img">[[File:VG2457V_Control_Keys.png|400px|alt=the location of the Control Panel keys|<translate> The location of the Control Panel Keys</translate>]]</div> | <div class="res-img">[[File:VG2457V_Control_Keys.png|400px|alt=the location of the Control Panel keys|<translate> <!--T:185--> The location of the Control Panel Keys</translate>]]</div> | ||
==<translate> ViewMode</translate>== | ==<translate> <!--T:186--> ViewMode</translate>== | ||
<translate> Press the '''1''' key to select one of the preset color settings.</translate> | <translate> <!--T:187--> Press the '''1''' key to select one of the preset color settings.</translate> | ||
<div class="res-img">[[File:VG2757V-2K_ViewMode.png|350px|alt=|the ViewMode quick menu<translate> Menu options from the ViewMode menu</translate>]]</div> | <div class="res-img">[[File:VG2757V-2K_ViewMode.png|350px|alt=|the ViewMode quick menu<translate> <!--T:188--> Menu options from the ViewMode menu</translate>]]</div> | ||
===<translate> LED Fill Light</translate>=== | ===<translate> <!--T:189--> LED Fill Light</translate>=== | ||
<translate> Press the '''2''' key to turn on the LED lights.</translate> | <translate> <!--T:190--> Press the '''2''' key to turn on the LED lights.</translate> | ||
<div class="res-img">[[File:VG2757V-2K_LED_Fill_Light.png|350px|alt=the LED Fill Light quick menu|<translate> The toggle button</translate>]]</div> | <div class="res-img">[[File:VG2757V-2K_LED_Fill_Light.png|350px|alt=the LED Fill Light quick menu|<translate> <!--T:191--> The toggle button</translate>]]</div> | ||
===<translate> Speaker Mute</translate>=== | ===<translate> <!--T:192--> Speaker Mute</translate>=== | ||
<translate> Press the '''3''' key to mute/unmute the speaker.</translate> | <translate> <!--T:193--> Press the '''3''' key to mute/unmute the speaker.</translate> | ||
===<translate> Microphone Mute</translate>=== | ===<translate> <!--T:194--> Microphone Mute</translate>=== | ||
<translate> Press the '''4''' key to mute/unmute the microphone.</translate> | <translate> <!--T:195--> Press the '''4''' key to mute/unmute the microphone.</translate> | ||
===<translate> Main Settings</translate>=== | ===<translate> <!--T:196--> Main Settings</translate>=== | ||
<translate> Press the '''5''' key to decrease/increase the Volume level, adjust the LED Fill Light, and enter the On-Screen Display (OSD) Menu.</translate> | <translate> <!--T:197--> Press the '''5''' key to decrease/increase the Volume level, adjust the LED Fill Light, and enter the On-Screen Display (OSD) Menu.</translate> | ||
<div class="res-img">[[File:VG2757V-2K_Main_Settings.png|350px|alt=the Main Settings quick menu|<translate> Menu options from the Main Settings menu</translate>]]</div> | <div class="res-img">[[File:VG2757V-2K_Main_Settings.png|350px|alt=the Main Settings quick menu|<translate> <!--T:198--> Menu options from the Main Settings menu</translate>]]</div> | ||
==<translate> Hot Keys</translate>== | ==<translate> <!--T:199--> Hot Keys</translate>== | ||
<translate> When the On-Screen Display (OSD) Menu is off, you can quickly access special functions by using the Control Panel Keys.</translate> | <translate> <!--T:200--> When the On-Screen Display (OSD) Menu is off, you can quickly access special functions by using the Control Panel Keys.</translate> | ||
{| class="wikitable" style="text-align:left; width:60%;" | {| class="wikitable" style="text-align:left; width:60%;" | ||
|- | |- | ||
! style="background-color:#DB0025; color:#ffffff; width:20%;"|<translate> Key</translate> | ! style="background-color:#DB0025; color:#ffffff; width:20%;"|<translate> <!--T:201--> Key</translate> | ||
! style="background-color:#DB0025; color:#ffffff;"|<translate> Description</translate> | ! style="background-color:#DB0025; color:#ffffff;"|<translate> <!--T:202--> Description</translate> | ||
|- | |- | ||
|style="background-color:#ffffff; text-align:center;"|'''2 + 3''' | |style="background-color:#ffffff; text-align:center;"|'''2 + 3''' | ||
|style="background-color:#ffffff;"|<p><translate> Press and hold the keys to lock/unlock the OSD Menu.</translate><p><translate>When the menu appears on the screen, continue holding both keys for 10 seconds to lock/unlock the OSD Menu</translate> | |style="background-color:#ffffff;"|<p><translate> <!--T:203--> Press and hold the keys to lock/unlock the OSD Menu.</translate><p><translate><!--T:204--> When the menu appears on the screen, continue holding both keys for 10 seconds to lock/unlock the OSD Menu</translate> | ||
<div class="res-img" style="text-align:center;">[[File:Monitor_Hot_Key_OSD.png|250px|<translate>OSD Lock/Unlock popup</translate>|alt=<translate>OSD Lock/Unlock popup</translate>]]</div> | <div class="res-img" style="text-align:center;">[[File:Monitor_Hot_Key_OSD.png|250px|<translate><!--T:205--> OSD Lock/Unlock popup</translate>|alt=<translate><!--T:206--> OSD Lock/Unlock popup</translate>]]</div> | ||
<p><translate>If the OSD Menu is locked, the below message will appear on the screen:</translate></p><div class="res-img" style="text-align:center;">[[File:Monitor_Hot_Key_OSD_Locked.PNG|250px|alt=|<translate>OSD Locked popup message</translate>|alt=<translate>OSD Locked popup message</translate>]]</div> | <p><translate><!--T:207--> If the OSD Menu is locked, the below message will appear on the screen:</translate></p><div class="res-img" style="text-align:center;">[[File:Monitor_Hot_Key_OSD_Locked.PNG|250px|alt=|<translate><!--T:208--> OSD Locked popup message</translate>|alt=<translate><!--T:209--> OSD Locked popup message</translate>]]</div> | ||
|- | |- | ||
|style="background-color:#ffffff; text-align:center;"|'''2 + 4''' | |style="background-color:#ffffff; text-align:center;"|'''2 + 4''' | ||
|style="background-color:#ffffff;"|<p><translate> Press and hold the keys to lock/unlock the '''Power '''</translate> <i class='fas fa-power-off' style="font-size:22px;></i> <translate> button.</translate></p> | |style="background-color:#ffffff;"|<p><translate> <!--T:210--> Press and hold the keys to lock/unlock the '''Power '''</translate> <i class='fas fa-power-off' style="font-size:22px;></i> <translate> <!--T:211--> button.</translate></p> | ||
<p><translate> When the menu appears on the screen, continue holding the key for 10 seconds to lock/unlock the '''Power'''</translate> <i class='fas fa-power-off' style="font-size:22px;></i> <translate> button.</translate></p> | <p><translate> <!--T:212--> When the menu appears on the screen, continue holding the key for 10 seconds to lock/unlock the '''Power'''</translate> <i class='fas fa-power-off' style="font-size:22px;></i> <translate> <!--T:213--> button.</translate></p> | ||
<div class="res-img" style="text-align:center;">[[File:Monitor_Hot_Key_Power.png|250px]]</div> | <div class="res-img" style="text-align:center;">[[File:Monitor_Hot_Key_Power.png|250px]]</div> | ||
<p><translate> If the '''Power'''</translate> <i class='fas fa-power-off' style="font-size:22px;></i> <translate> button is locked, the below message will appear on the screen.</translate> | <p><translate> <!--T:214--> If the '''Power'''</translate> <i class='fas fa-power-off' style="font-size:22px;></i> <translate> <!--T:215--> button is locked, the below message will appear on the screen.</translate> | ||
<div class="res-img" style="text-align:center;">[[File:Monitor_Hot_Key_Power_Locked.PNG|250px]]</div> | <div class="res-img" style="text-align:center;">[[File:Monitor_Hot_Key_Power_Locked.PNG|250px]]</div> | ||
|- | |- | ||
|style="background-color:#ffffff; text-align:center;"|'''3 + 5''' | |style="background-color:#ffffff; text-align:center;"|'''3 + 5''' | ||
|style="background-color:#ffffff;"|<p><translate> Press and hold the keys to display/hide the boot up screen when the device is turned on.</translate></p> | |style="background-color:#ffffff;"|<p><translate> <!--T:216--> Press and hold the keys to display/hide the boot up screen when the device is turned on.</translate></p> | ||
<div class="res-img" style="text-align:center;">[[File:Monitor_Hot_Key_Boot.png|250px]]</div> | <div class="res-img" style="text-align:center;">[[File:Monitor_Hot_Key_Boot.png|250px]]</div> | ||
|} | |} | ||
==<translate> Configuring the Settings</translate>== | ==<translate> <!--T:217--> Configuring the Settings</translate>== | ||
===<translate> General Operations</translate>=== | ===<translate> <!--T:218--> General Operations</translate>=== | ||
<div class="res-img">[[File:VG2756-2K Key Guide.png|500px|alt=|<translate>Key Guide</translate>|alt=<translate>Key Guide</translate>]]</div> | <div class="res-img">[[File:VG2756-2K Key Guide.png|500px|alt=|<translate><!--T:219--> Key Guide</translate>|alt=<translate><!--T:220--> Key Guide</translate>]]</div> | ||
<ol> | <ol> | ||
<li><translate>Press the '''5''' key to display the '''Main Settings''' menu, then press the '''4''' key to enter the OSD Menu.</translate></li> | <li><translate><!--T:221--> Press the '''5''' key to display the '''Main Settings''' menu, then press the '''4''' key to enter the OSD Menu.</translate></li> | ||
<div class="res-img">[[File:VG2457V_OSD_Menu_1.png|500px|alt=|<translate> Display the OSD Menu</translate>]]</div> | <div class="res-img">[[File:VG2457V_OSD_Menu_1.png|500px|alt=|<translate> <!--T:222--> Display the OSD Menu</translate>]]</div> | ||
<li><translate>Press the '''1''' or '''2''' key to select the main menu. Then press the '''3''' key to enter the selected menu.</translate></li> | <li><translate><!--T:223--> Press the '''1''' or '''2''' key to select the main menu. Then press the '''3''' key to enter the selected menu.</translate></li> | ||
<div class="res-img">[[File:VG2457V_OSD_Menu_2.png|500px|alt=|<translate> Navigate the OSD Menu</translate>]]</div> | <div class="res-img">[[File:VG2457V_OSD_Menu_2.png|500px|alt=|<translate> <!--T:224--> Navigate the OSD Menu</translate>]]</div> | ||
<li><translate>Press the '''1''' or '''2''' key to select the desired menu option. Then press the '''3''' key to enter the sub-menu.</translate></li> | <li><translate><!--T:225--> Press the '''1''' or '''2''' key to select the desired menu option. Then press the '''3''' key to enter the sub-menu.</translate></li> | ||
<div class="res-img">[[File:VG2457V_OSD_Menu_3.png|500px|alt=|<translate> Navigate the OSD Menu</translate>]]</div> | <div class="res-img">[[File:VG2457V_OSD_Menu_3.png|500px|alt=|<translate> <!--T:226--> Navigate the OSD Menu</translate>]]</div> | ||
<li><translate>Press the '''1 ''' or '''2''' key to adjust/select the setting. Then press the '''3''' key to confirm.</translate></li> | <li><translate><!--T:227--> Press the '''1 ''' or '''2''' key to adjust/select the setting. Then press the '''3''' key to confirm.</translate></li> | ||
<div class="res-img">[[File:VG2457V_OSD_Menu_4.png|500px|alt=|<translate> Make adjustments as needed</translate>]]</div> | <div class="res-img">[[File:VG2457V_OSD_Menu_4.png|500px|alt=|<translate> <!--T:228--> Make adjustments as needed</translate>]]</div> | ||
{{Note|<translate>Certain menu option adjustments do not require the user to press the '''3''' key to confirm the selection. Follow the key guide that appears on the screen to select the option or make adjustments.</translate>}} | {{Note|<translate><!--T:229--> Certain menu option adjustments do not require the user to press the '''3''' key to confirm the selection. Follow the key guide that appears on the screen to select the option or make adjustments.</translate>}} | ||
<li><translate>Press the '''4''' key to return to the previous menu.</translate></li> | <li><translate><!--T:230--> Press the '''4''' key to return to the previous menu.</translate></li> | ||
</ol> | </ol> | ||
===<translate> Menu Options</translate>=== | ===<translate> <!--T:231--> Menu Options</translate>=== | ||
====<translate> Input Select</translate>==== | ====<translate> <!--T:232--> Input Select</translate>==== | ||
<div style="res-img">[[File:VG2457V_OSD_Input_Select.png|500px|alt=the Input Select menu|<translate> Input Select menu</translate>]]</div> | <div style="res-img">[[File:VG2457V_OSD_Input_Select.png|500px|alt=the Input Select menu|<translate> <!--T:233--> Input Select menu</translate>]]</div> | ||
<ol> | <ol> | ||
<li><translate>Press the '''5''' key to display the '''Main Settings''' menu, then press the '''4''' key to enter the OSD Menu.</translate></li> | <li><translate><!--T:234--> Press the '''5''' key to display the '''Main Settings''' menu, then press the '''4''' key to enter the OSD Menu.</translate></li> | ||
<li><translate>Press the '''1''' or '''2''' key to select '''Input Select'''. Then press the '''3''' key to enter the '''Input Select''' menu.</translate></li> | <li><translate><!--T:235--> Press the '''1''' or '''2''' key to select '''Input Select'''. Then press the '''3''' key to enter the '''Input Select''' menu.</translate></li> | ||
<li><translate>Press the '''1''' or '''2''' key to select the desired input source. Then press the '''3''' key to confirm the selection.</translate></li> | <li><translate><!--T:236--> Press the '''1''' or '''2''' key to select the desired input source. Then press the '''3''' key to confirm the selection.</translate></li> | ||
</ol> | </ol> | ||
====<translate> Coference Mode</translate>==== | ====<translate> <!--T:237--> Coference Mode</translate>==== | ||
<div style="res-img">[[File:VG2457V_OSD_Conference_Mode.png|500px|alt=the Conference Mode menu|<translate> Conference Mode menu</translate>]]</div> | <div style="res-img">[[File:VG2457V_OSD_Conference_Mode.png|500px|alt=the Conference Mode menu|<translate> <!--T:238--> Conference Mode menu</translate>]]</div> | ||
<ol> | <ol> | ||
<li><translate>Press the '''5''' key to display the '''Main Settings''' menu, then press the '''4''' key to enter the OSD Menu.</translate></li> | <li><translate><!--T:239--> Press the '''5''' key to display the '''Main Settings''' menu, then press the '''4''' key to enter the OSD Menu.</translate></li> | ||
<li><translate>Press the '''1''' or '''2''' key to select '''Conference Mode'''. Then press the '''3''' key to enter the '''Conference Mode''' menu.</translate></li> | <li><translate><!--T:240--> Press the '''1''' or '''2''' key to select '''Conference Mode'''. Then press the '''3''' key to enter the '''Conference Mode''' menu.</translate></li> | ||
<li><translate>Press the '''1''' or '''2''' key to select the menu option. Then press the '''3''' key to enter its sub-menu.</translate></li> | <li><translate><!--T:241--> Press the '''1''' or '''2''' key to select the menu option. Then press the '''3''' key to enter its sub-menu.</translate></li> | ||
<li><translate>Press the '''1''' or '''2''' key to adjust/select the setting. Then press the '''3''' key to confirm (if applicable).</translate></li></ol> | <li><translate><!--T:242--> Press the '''1''' or '''2''' key to adjust/select the setting. Then press the '''3''' key to confirm (if applicable).</translate></li></ol> | ||
{| class="wikitable" style="background-color:#ffffff; width:60%;" | {| class="wikitable" style="background-color:#ffffff; width:60%;" | ||
! style="background-color:#DB0025; color:#ffffff; width:20%;" | <translate> Menu Option</translate> | ! style="background-color:#DB0025; color:#ffffff; width:20%;" | <translate> <!--T:243--> Menu Option</translate> | ||
! style="background-color:#DB0025; color:#ffffff;" | <translate> Description</translate> | ! style="background-color:#DB0025; color:#ffffff;" | <translate> <!--T:244--> Description</translate> | ||
|- | |- | ||
|style="font-weight:bold; text-align:center;" | <translate> LED Fill Light</translate> | |style="font-weight:bold; text-align:center;" | <translate> <!--T:245--> LED Fill Light</translate> | ||
|<translate> Adjust the LED lighting values.</translate> | |<translate> <!--T:246--> Adjust the LED lighting values.</translate> | ||
|- | |- | ||
| style="font-weight:bold; text-align:center;" | <translate> Speaker Volume</translate> | | style="font-weight:bold; text-align:center;" | <translate> <!--T:247--> Speaker Volume</translate> | ||
|<translate> Adjust the speaker volume level.</translate> | |<translate> <!--T:248--> Adjust the speaker volume level.</translate> | ||
|- | |- | ||
| style="font-weight:bold; text-align:center;" | <translate> Speaker Mute</translate> | | style="font-weight:bold; text-align:center;" | <translate> <!--T:249--> Speaker Mute</translate> | ||
|<translate> Mute/unmute the speaker.</translate> | |<translate> <!--T:250--> Mute/unmute the speaker.</translate> | ||
|- | |- | ||
| style="font-weight:bold; text-align:center;" | <translate> Microphone Mute</translate> | | style="font-weight:bold; text-align:center;" | <translate> <!--T:251--> Microphone Mute</translate> | ||
|<translate> Mute/unmute the microphone.</translate> | |<translate> <!--T:252--> Mute/unmute the microphone.</translate> | ||
|} | |} | ||
====<translate> ViewMode</translate>==== | ====<translate> <!--T:253--> ViewMode</translate>==== | ||
<div style="res-img">[[File:VG2457V_OSD_ViewMode.png|500px|alt=ViewMode menu|<translate> ViewMode menu</translate>]]</div> | <div style="res-img">[[File:VG2457V_OSD_ViewMode.png|500px|alt=ViewMode menu|<translate> <!--T:254--> ViewMode menu</translate>]]</div> | ||
<ol> | <ol> | ||
<li><translate> Press the '''5''' key to display the '''Main Settings''' menu, then press the '''4''' key to enter the OSD Menu.</translate></li> | <li><translate> <!--T:255--> Press the '''5''' key to display the '''Main Settings''' menu, then press the '''4''' key to enter the OSD Menu.</translate></li> | ||
<li><translate> Press the '''1''' or '''2''' key to select '''ViewMode'''. Then press the '''3''' key to enter the '''ViewMode''' menu.</translate></li> | <li><translate> <!--T:256--> Press the '''1''' or '''2''' key to select '''ViewMode'''. Then press the '''3''' key to enter the '''ViewMode''' menu.</translate></li> | ||
<li><translate> Press the '''1''' or '''2''' key to select the setting. Then press the '''3''' key to confirm the selection.</translate></li></ol> | <li><translate> <!--T:257--> Press the '''1''' or '''2''' key to select the setting. Then press the '''3''' key to confirm the selection.</translate></li></ol> | ||
{{Note|<translate> Some sub-menu options may have another sub-menu. To enter the respective sub-menu, press the '''3''' key. Follow the key guide that appears on the screen to select the option or make adjustments.</translate>}} | {{Note|<translate> <!--T:258--> Some sub-menu options may have another sub-menu. To enter the respective sub-menu, press the '''3''' key. Follow the key guide that appears on the screen to select the option or make adjustments.</translate>}} | ||
{| class="wikitable" style="background-color:#ffffff; width:60%;" | {| class="wikitable" style="background-color:#ffffff; width:60%;" | ||
! style="background-color:#DB0025; color:#ffffff; width:20%;" | <translate> Menu Option</translate> | ! style="background-color:#DB0025; color:#ffffff; width:20%;" | <translate> <!--T:259--> Menu Option</translate> | ||
! style="background-color:#DB0025; color:#ffffff;" | <translate> Description</translate> | ! style="background-color:#DB0025; color:#ffffff;" | <translate> <!--T:260--> Description</translate> | ||
|- | |- | ||
| style="font-weight:bold; text-align:center;" | <translate> Off</translate> | | style="font-weight:bold; text-align:center;" | <translate> <!--T:261--> Off</translate> | ||
|<translate> Disable the function.</translate> | |<translate> <!--T:262--> Disable the function.</translate> | ||
|- | |- | ||
| style="font-weight:bold; text-align:center;" | <translate> Office</translate> | | style="font-weight:bold; text-align:center;" | <translate> <!--T:263--> Office</translate> | ||
|<translate> Select this option for office applications.</translate> | |<translate> <!--T:264--> Select this option for office applications.</translate> | ||
|- | |- | ||
| style="font-weight:bold; text-align:center;" | <translate> Movie</translate> | | style="font-weight:bold; text-align:center;" | <translate> <!--T:265--> Movie</translate> | ||
|<translate> Select this option for watching movies.</translate> | |<translate> <!--T:266--> Select this option for watching movies.</translate> | ||
|- | |- | ||
| style="font-weight:bold; text-align:center;" | <translate> MAC</translate> | | style="font-weight:bold; text-align:center;" | <translate> <!--T:267--> MAC</translate> | ||
|<translate> Select this option when connecting the moniter to Mac computers.</translate> | |<translate> <!--T:268--> Select this option when connecting the moniter to Mac computers.</translate> | ||
|- | |- | ||
| style="font-weight:bold; text-align:center;" | <translate> Mono</translate> | | style="font-weight:bold; text-align:center;" | <translate> <!--T:269--> Mono</translate> | ||
|<translate> Select this option for monichrome.</translate> | |<translate> <!--T:270--> Select this option for monichrome.</translate> | ||
|- | |- | ||
| style="font-weight:bold; text-align:center;" | <translate> Game</translate> | | style="font-weight:bold; text-align:center;" | <translate> <!--T:271--> Game</translate> | ||
|<translate> Select this option for playing games.</translate> | |<translate> <!--T:272--> Select this option for playing games.</translate> | ||
|} | |} | ||
====<translate> Color Adjust</translate>==== | ====<translate> <!--T:273--> Color Adjust</translate>==== | ||
{{Note|<translate>Some sub-menus may not be adjustable depending on the user’s custom settings.</translate>}} | {{Note|<translate><!--T:274--> Some sub-menus may not be adjustable depending on the user’s custom settings.</translate>}} | ||
<div style="res-img">[[File:VG2457V_OSD_Color_Adjust.png|600px|alt=the Color Adjust menu|<translate> Color Adjust menu</translate>]]</div> | <div style="res-img">[[File:VG2457V_OSD_Color_Adjust.png|600px|alt=the Color Adjust menu|<translate> <!--T:275--> Color Adjust menu</translate>]]</div> | ||
<ol> | <ol> | ||
<li><translate> Press the '''5''' key to display the '''Main Settings''' menu, then press the '''4''' key to enter the OSD Menu.</translate></li> | <li><translate> <!--T:276--> Press the '''5''' key to display the '''Main Settings''' menu, then press the '''4''' key to enter the OSD Menu.</translate></li> | ||
<li><translate> Press the '''1''' or '''2''' key to select '''Color Adjust'''. Then press the '''3''' key to enter the '''Color Adjust''' menu.</translate></li> | <li><translate> <!--T:277--> Press the '''1''' or '''2''' key to select '''Color Adjust'''. Then press the '''3''' key to enter the '''Color Adjust''' menu.</translate></li> | ||
<li><translate> Press the '''1''' or '''2''' key to select the menu option. Then press the '''3''' key to enter its sub-menu.</translate></li> | <li><translate> <!--T:278--> Press the '''1''' or '''2''' key to select the menu option. Then press the '''3''' key to enter its sub-menu.</translate></li> | ||
<li><translate> Press the '''1''' or '''2''' key to select the setting. Then press the '''3''' key to confirm the selection.</translate></li></ol> | <li><translate> <!--T:279--> Press the '''1''' or '''2''' key to select the setting. Then press the '''3''' key to confirm the selection.</translate></li></ol> | ||
{{Note|<translate> Some sub-menu options may have another sub-menu. To enter the respective sub-menu, press the '''3''' key. Follow the key guide that appears on the bottom of the screen to select the option or make adjustments.</translate>}} | {{Note|<translate> <!--T:280--> Some sub-menu options may have another sub-menu. To enter the respective sub-menu, press the '''3''' key. Follow the key guide that appears on the bottom of the screen to select the option or make adjustments.</translate>}} | ||
{| class="wikitable" style="background-color:#ffffff; width:60%;" | {| class="wikitable" style="background-color:#ffffff; width:60%;" | ||
! style="background-color:#DB0025; color:#ffffff; width:20%;" | <translate> Menu Option</translate> | ! style="background-color:#DB0025; color:#ffffff; width:20%;" | <translate> <!--T:281--> Menu Option</translate> | ||
! style="background-color:#DB0025; color:#ffffff;" | <translate> Description</translate> | ! style="background-color:#DB0025; color:#ffffff;" | <translate> <!--T:282--> Description</translate> | ||
|- | |- | ||
| rowspan="2" style="text-align:center;" | '''<translate> Contrast/Brightness</translate>''' | | rowspan="2" style="text-align:center;" | '''<translate> <!--T:283--> Contrast/Brightness</translate>''' | ||
|<p><u><translate> Contrast</translate></u></p><translate>Adjust the degree of difference between the lightest and darkest parts of the picture and change the amount of black and white in the image.</translate> | |<p><u><translate> <!--T:284--> Contrast</translate></u></p><translate><!--T:285--> Adjust the degree of difference between the lightest and darkest parts of the picture and change the amount of black and white in the image.</translate> | ||
|- | |- | ||
|<p><u><translate> Brightness</translate></u></p><translate>Adjust the background black levels of the screen image.</translate> | |<p><u><translate> <!--T:286--> Brightness</translate></u></p><translate><!--T:287--> Adjust the background black levels of the screen image.</translate> | ||
|- | |- | ||
|style="text-align:center;" | '''<translate> Color Temperature</translate>''' | |style="text-align:center;" | '''<translate> <!--T:288--> Color Temperature</translate>''' | ||
|<translate> Select the color temperature setting.</translate> | |<translate> <!--T:289--> Select the color temperature setting.</translate> | ||
<translate>*Bluish: Set the color temperature to 9300K.</translate> | <translate><!--T:290--> *Bluish: Set the color temperature to 9300K.</translate> | ||
<translate>*Cool: Set the color temperature to 7500K.</translate> | <translate><!--T:291--> *Cool: Set the color temperature to 7500K.</translate> | ||
<translate>*Native: Default color temperature. Recommended for regular use.</translate> | <translate><!--T:292--> *Native: Default color temperature. Recommended for regular use.</translate> | ||
<translate>*Warm: Set the color temperature to 5000K.</translate> | <translate><!--T:293--> *Warm: Set the color temperature to 5000K.</translate> | ||
<translate>*User Color: Adjust red, green, and blue values as desire.</translate> | <translate><!--T:294--> *User Color: Adjust red, green, and blue values as desire.</translate> | ||
|- | |- | ||
|style="text-align:center;" | '''<translate> Color Space</translate>''' | |style="text-align:center;" | '''<translate> <!--T:295--> Color Space</translate>''' | ||
|<p><translate> Allows users to choose which color space they would like to use for monitor color output.</translate></p> | |<p><translate> <!--T:296--> Allows users to choose which color space they would like to use for monitor color output.</translate></p> | ||
<translate>* Auto: Automatically recognizes the color format and black and white levels.</translate> | <translate><!--T:297--> * Auto: Automatically recognizes the color format and black and white levels.</translate> | ||
<translate>* RGB: The input signal color format is RGB.</translate> | <translate><!--T:298--> * RGB: The input signal color format is RGB.</translate> | ||
<translate>* YUV: The input signal color format is YUV.</translate> | <translate><!--T:299--> * YUV: The input signal color format is YUV.</translate> | ||
|- | |- | ||
|style="text-align:center;" | '''<translate> Color Range</translate>''' | |style="text-align:center;" | '''<translate> <!--T:300--> Color Range</translate>''' | ||
|<p><translate> The monitor can detect the input signal color range automatically. You can manually change the color range options to fit the correct color range if the colors are not displayed correctly.</translate></p> | |<p><translate> <!--T:301--> The monitor can detect the input signal color range automatically. You can manually change the color range options to fit the correct color range if the colors are not displayed correctly.</translate></p> | ||
<translate>* Auto: Automatically recognizes the color format and black and white levels.</translate> | <translate><!--T:302--> * Auto: Automatically recognizes the color format and black and white levels.</translate> | ||
<translate>* Full Range: Black and white levels are full.</translate> | <translate><!--T:303--> * Full Range: Black and white levels are full.</translate> | ||
<translate>* Limited Range: Black and white levels are limited.</translate> | <translate><!--T:304--> * Limited Range: Black and white levels are limited.</translate> | ||
|- | |- | ||
|style="text-align:center;" | '''<translate> Gamma</translate>''' | |style="text-align:center;" | '''<translate> <!--T:305--> Gamma</translate>''' | ||
|<p><translate> Manually adjust the brightness level of the monitor’s grayscale levels.</translate></p> | |<p><translate> <!--T:306--> Manually adjust the brightness level of the monitor’s grayscale levels.</translate></p> | ||
|} | |} | ||
====<translate> Manual Image Adjust</translate>==== | ====<translate> <!--T:307--> Manual Image Adjust</translate>==== | ||
<div style="res-img">[[File:VG2457V_OSD_Manual_Image_Adjust.png|500px|alt=the Manual Image Adjust menu|<translate>Manual Image Adjust menu</translate>]]</div> | <div style="res-img">[[File:VG2457V_OSD_Manual_Image_Adjust.png|500px|alt=the Manual Image Adjust menu|<translate><!--T:308--> Manual Image Adjust menu</translate>]]</div> | ||
<ol> | <ol> | ||
<li><translate> Press the '''5''' key to display the '''Main Settings''' menu, then press the '''4''' key to enter the OSD Menu.</translate></li> | <li><translate> <!--T:309--> Press the '''5''' key to display the '''Main Settings''' menu, then press the '''4''' key to enter the OSD Menu.</translate></li> | ||
<li><translate> Press the '''1''' or '''2''' key to select '''Manual Image Adjust'''. Then press the '''3''' key to enter the '''Manual Image Adjust''' menu.</translate></li> | <li><translate> <!--T:310--> Press the '''1''' or '''2''' key to select '''Manual Image Adjust'''. Then press the '''3''' key to enter the '''Manual Image Adjust''' menu.</translate></li> | ||
<li><translate> Press the '''1''' or '''2''' key to select the menu option. Then press the '''3''' key to enter its sub-menu.</translate></li> | <li><translate> <!--T:311--> Press the '''1''' or '''2''' key to select the menu option. Then press the '''3''' key to enter its sub-menu.</translate></li> | ||
<li><translate> Press the '''1''' or '''2''' key to adjust/select the setting. Then press the '''3''' key to confirm (if applicable).</translate></li></ol> | <li><translate> <!--T:312--> Press the '''1''' or '''2''' key to adjust/select the setting. Then press the '''3''' key to confirm (if applicable).</translate></li></ol> | ||
{| class="wikitable" style="background-color:#ffffff; width:60%;" | {| class="wikitable" style="background-color:#ffffff; width:60%;" | ||
! style="background-color:#DB0025; color:#ffffff; width:20%;" | <translate> Menu Option</translate> | ! style="background-color:#DB0025; color:#ffffff; width:20%;" | <translate> <!--T:313--> Menu Option</translate> | ||
! style="background-color:#DB0025; color:#ffffff;" | <translate> Description</translate> | ! style="background-color:#DB0025; color:#ffffff;" | <translate> <!--T:314--> Description</translate> | ||
|- | |- | ||
| style="font-weight:bold; text-align:center;" | <translate> Sharpness</translate> | | style="font-weight:bold; text-align:center;" | <translate> <!--T:315--> Sharpness</translate> | ||
|<translate> Adjust the sharpness and picture quality of the monitor.</translate> | |<translate> <!--T:316--> Adjust the sharpness and picture quality of the monitor.</translate> | ||
|- | |- | ||
| style="font-weight:bold; text-align:center;" | <translate> Aspect Ratio</translate> | | style="font-weight:bold; text-align:center;" | <translate> <!--T:317--> Aspect Ratio</translate> | ||
|<translate> Select the aspect ratio of the monitor.</translate> | |<translate> <!--T:318--> Select the aspect ratio of the monitor.</translate> | ||
|- | |- | ||
| style="font-weight:bold; text-align:center;" | <translate> Overscan</translate> | | style="font-weight:bold; text-align:center;" | <translate> <!--T:319--> Overscan</translate> | ||
|<translate> SEnable this option to automatically enlarge the original picture horizontally and vertically to an equal aspect ratio that fills the screen.</translate> | |<translate> <!--T:320--> SEnable this option to automatically enlarge the original picture horizontally and vertically to an equal aspect ratio that fills the screen.</translate> | ||
|} | |} | ||
====<translate> Setup Menu</translate>==== | ====<translate> <!--T:321--> Setup Menu</translate>==== | ||
<div style="res-img">[[File:VG2457V_OSD_Setup_Menu.png|500px|alt=the Setup menu|<translate> Setup menu</translate>]]</div> | <div style="res-img">[[File:VG2457V_OSD_Setup_Menu.png|500px|alt=the Setup menu|<translate> <!--T:322--> Setup menu</translate>]]</div> | ||
<ol> | <ol> | ||
<li><translate> Press the '''5''' key to display the '''Main Settings''' menu, then press the '''4''' key to enter the OSD Menu.</translate></li> | <li><translate> <!--T:323--> Press the '''5''' key to display the '''Main Settings''' menu, then press the '''4''' key to enter the OSD Menu.</translate></li> | ||
<li><translate> Press the '''1''' or '''2''' key to select '''Setup Menu'''. Then press the '''3''' key to enter the '''Setup Menu''' menu.</translate></li> | <li><translate> <!--T:324--> Press the '''1''' or '''2''' key to select '''Setup Menu'''. Then press the '''3''' key to enter the '''Setup Menu''' menu.</translate></li> | ||
<li><translate> Press the '''1''' or '''2''' key to select the menu option. Then press the '''3''' key to enter its sub-menu.</translate></li> | <li><translate> <!--T:325--> Press the '''1''' or '''2''' key to select the menu option. Then press the '''3''' key to enter its sub-menu.</translate></li> | ||
<li><translate> Press the '''1''' or '''2''' key to select the setting. Then press the '''3''' key to confirm the selection.</translate></li></ol> | <li><translate> <!--T:326--> Press the '''1''' or '''2''' key to select the setting. Then press the '''3''' key to confirm the selection.</translate></li></ol> | ||
{{Note|<translate> Some sub-menu options may have another sub-menu. To enter the respective sub-menu, press the '''3''' key. Follow the key guide that appears on the screen to select the option or make adjustments.</translate>}} | {{Note|<translate> <!--T:327--> Some sub-menu options may have another sub-menu. To enter the respective sub-menu, press the '''3''' key. Follow the key guide that appears on the screen to select the option or make adjustments.</translate>}} | ||
{| class="wikitable" style="background-color:#ffffff; width:60%;" | {| class="wikitable" style="background-color:#ffffff; width:60%;" | ||
! style="background-color:#DB0025; color:#ffffff; width:20%;" | <translate> Menu Option</translate> | ! style="background-color:#DB0025; color:#ffffff; width:20%;" | <translate> <!--T:328--> Menu Option</translate> | ||
! style="background-color:#DB0025; color:#ffffff;" | <translate> Description</translate> | ! style="background-color:#DB0025; color:#ffffff;" | <translate> <!--T:329--> Description</translate> | ||
|- | |- | ||
| style="text-align:center;" | '''<translate> Language Select</translate>''' | | style="text-align:center;" | '''<translate> <!--T:330--> Language Select</translate>''' | ||
|<translate> Select an available language for the OSD Menu.</translate> | |<translate> <!--T:331--> Select an available language for the OSD Menu.</translate> | ||
|- | |- | ||
| style="text-align:center;" | '''<translate> Resolution Notice</translate>''' | | style="text-align:center;" | '''<translate> <!--T:332--> Resolution Notice</translate>''' | ||
|<translate> Enable this option to allow the system to inform users that the current viewing resolution is not the correct native resolution.</translate> | |<translate> <!--T:333--> Enable this option to allow the system to inform users that the current viewing resolution is not the correct native resolution.</translate> | ||
|- | |- | ||
| style="text-align:center;" | '''<translate> Information</translate>''' | | style="text-align:center;" | '''<translate> <!--T:334--> Information</translate>''' | ||
|<translate> Display the monitor information.</translate> | |<translate> <!--T:335--> Display the monitor information.</translate> | ||
|- | |- | ||
| style="text-align:center;" | '''<translate> OSD Timeout</translate>''' | | style="text-align:center;" | '''<translate> <!--T:336--> OSD Timeout</translate>''' | ||
|<translate> Set the length of time the OSD Menu remains on screen.</translate> | |<translate> <!--T:337--> Set the length of time the OSD Menu remains on screen.</translate> | ||
|- | |- | ||
| style="text-align:center;" | '''<translate> OSD Background</translate>''' | | style="text-align:center;" | '''<translate> <!--T:338--> OSD Background</translate>''' | ||
|<translate> Show/Hide the OSD background when the OSD Menu appears on the screen.</translate> | |<translate> <!--T:339--> Show/Hide the OSD background when the OSD Menu appears on the screen.</translate> | ||
|- | |- | ||
| style="text-align:center;" | '''<translate> Power Indicator</translate>''' | | style="text-align:center;" | '''<translate> <!--T:340--> Power Indicator</translate>''' | ||
|<translate> Set the Power Indicator On or Off. If the setting is set to On, the power indicator lights blue when the device is turned on.</translate> | |<translate> <!--T:341--> Set the Power Indicator On or Off. If the setting is set to On, the power indicator lights blue when the device is turned on.</translate> | ||
|- | |- | ||
| style="text-align:center;" | '''<translate> Auto Power Off</translate>''' | | style="text-align:center;" | '''<translate> <!--T:342--> Auto Power Off</translate>''' | ||
|<translate> Enable this option to allow the monitor to automatically turn off after a certain amount of time.</translate> | |<translate> <!--T:343--> Enable this option to allow the monitor to automatically turn off after a certain amount of time.</translate> | ||
|- | |- | ||
| style="text-align:center;" | '''<translate> Sleep</translate>''' | | style="text-align:center;" | '''<translate> <!--T:344--> Sleep</translate>''' | ||
|<translate> Set the amount of idle time before the monitor enters Sleep mode.</translate> | |<translate> <!--T:345--> Set the amount of idle time before the monitor enters Sleep mode.</translate> | ||
|- | |- | ||
| style="text-align:center;" | '''<translate> ECO Mode</translate>''' | | style="text-align:center;" | '''<translate> <!--T:346--> ECO Mode</translate>''' | ||
|<translate> Choose between various modes, based on power consumption.</translate> | |<translate> <!--T:347--> Choose between various modes, based on power consumption.</translate> | ||
|- | |- | ||
| style="text-align:center;" | '''<translate> DisplayPort 1.2</translate>''' | | style="text-align:center;" | '''<translate> <!--T:348--> DisplayPort 1.2</translate>''' | ||
|<translate> If the connected device does not support DisplayPort 1.4, the DisplayPort version can be changed to 1.2.</translate> | |<translate> <!--T:349--> If the connected device does not support DisplayPort 1.4, the DisplayPort version can be changed to 1.2.</translate> | ||
|- | |- | ||
| style="text-align:center;" | '''<translate> HDMI Version</translate>''' | | style="text-align:center;" | '''<translate> <!--T:350--> HDMI Version</translate>''' | ||
|<translate> If the connected device does not support HDMI 2.0, the HDMI version can be changed to 1.4.</translate> | |<translate> <!--T:351--> If the connected device does not support HDMI 2.0, the HDMI version can be changed to 1.4.</translate> | ||
|- | |- | ||
| style="text-align:center;" | '''<translate> USB 3.2</translate>''' | | style="text-align:center;" | '''<translate> <!--T:352--> USB 3.2</translate>''' | ||
|<translate> Select if the USB Type C port will support USB 2.0 or USB 3.2.</translate> | |<translate> <!--T:353--> Select if the USB Type C port will support USB 2.0 or USB 3.2.</translate> | ||
|- | |- | ||
| style="text-align:center;" | '''<translate> DDC/CI</translate>''' | | style="text-align:center;" | '''<translate> <!--T:354--> DDC/CI</translate>''' | ||
|<translate> Enable this option to allow the monitor control via the graphics card.</translate> | |<translate> <!--T:355--> Enable this option to allow the monitor control via the graphics card.</translate> | ||
|- | |- | ||
| style="text-align:center;" | '''<translate> Auto Detect</translate>''' | | style="text-align:center;" | '''<translate> <!--T:356--> Auto Detect</translate>''' | ||
|<translate> Automatically detect the input signal.</translate> | |<translate> <!--T:357--> Automatically detect the input signal.</translate> | ||
|- | |- | ||
| style="text-align:center;" | '''<translate> All Recall</translate>''' | | style="text-align:center;" | '''<translate> <!--T:358--> All Recall</translate>''' | ||
|<translate> Resets all settings to their default values.</translate> | |<translate> <!--T:359--> Resets all settings to their default values.</translate> | ||
|- | |- | ||
|} | |} | ||
=<translate> Appendix</translate>= | =<translate> <!--T:360--> Appendix</translate>= | ||
==<translate> Product Specifications</translate>== | ==<translate> <!--T:361--> Product Specifications</translate>== | ||
{| class="wikitable" style="background-color:#ffffff; width:auto%;" | {| class="wikitable" style="background-color:#ffffff; width:auto%;" | ||
! style="background-color:#DB0025; color:#ffffff; width:20%;" | <translate> Item</translate> | ! style="background-color:#DB0025; color:#ffffff; width:20%;" | <translate> <!--T:362--> Item</translate> | ||
! style="background-color:#DB0025; color:#ffffff; width:20%;" | <translate> Category</translate> | ! style="background-color:#DB0025; color:#ffffff; width:20%;" | <translate> <!--T:363--> Category</translate> | ||
! style="background-color:#DB0025; color:#ffffff;" | <translate> Specifications</translate> | ! style="background-color:#DB0025; color:#ffffff;" | <translate> <!--T:364--> Specifications</translate> | ||
|- | |- | ||
| rowspan="5" style="font-weight:bold; text-align:center;" | LCD | | rowspan="5" style="font-weight:bold; text-align:center;" | LCD | ||
| Line 521: | Line 525: | ||
| Anti-Glare (Haze 25%), Hard Coating (3H) | | Anti-Glare (Haze 25%), Hard Coating (3H) | ||
|- | |- | ||
| style="font-weight:bold; text-align:center;" | <translate> Input Signal</translate> | | style="font-weight:bold; text-align:center;" | <translate> <!--T:365--> Input Signal</translate> | ||
| style="text-align:center;"|Video Sync | | style="text-align:center;"|Video Sync | ||
| <u>TMDS digital (100 Ω)</u> | | <u>TMDS digital (100 Ω)</u> | ||
| Line 528: | Line 532: | ||
:'''Type C''': f<sub>h</sub>: 30~150 kHz, f<sub>v</sub>: 48~100 Hz | :'''Type C''': f<sub>h</sub>: 30~150 kHz, f<sub>v</sub>: 48~100 Hz | ||
|- | |- | ||
| rowspan="2" style="font-weight:bold; text-align:center;" | <translate> Compatibility</translate> | | rowspan="2" style="font-weight:bold; text-align:center;" | <translate> <!--T:366--> Compatibility</translate> | ||
| style="text-align:center;"|PC | | style="text-align:center;"|PC | ||
| up to 3440 x 1440 | | up to 3440 x 1440 | ||
| Line 535: | Line 539: | ||
| up to 3440 x 1440 | | up to 3440 x 1440 | ||
|- | |- | ||
| rowspan="2" style="font-weight:bold; text-align:center;"|Resolution and Timings<ref><translate>Do not set the graphics card in your computer to exceed these timing modes; doing so may result in permanent damage to the display.</translate></ref> | | rowspan="2" style="font-weight:bold; text-align:center;"|Resolution and Timings<ref><translate><!--T:367--> Do not set the graphics card in your computer to exceed these timing modes; doing so may result in permanent damage to the display.</translate></ref> | ||
| style="text-align:center;"|Recommended | | style="text-align:center;"|Recommended | ||
|3440 x 1440 @ 60 Hz | |3440 x 1440 @ 60 Hz | ||
|- | |- | ||
| style="text-align:center;"|<translate> Supported</translate> | | style="text-align:center;"|<translate> <!--T:368--> Supported</translate> | ||
| | | | ||
* 3440 x 1440 @ 60, 75, 100 Hz<ref><translate>Disclaimer: When displaying 3440 x 1440 @ 75/100Hz resolution via USB-C, if USB-C 3.2 is set to “ON”, the video input will only support YCbCr 4:2:2 format, please check if your graphics card supports it. If USB-C 3.2 is set to “OFF”, the video input can support RGB format, but data transfer & Ethernet speed will be limited to USB 2.0 due to bandwidth limitation.</translate></ref> | * 3440 x 1440 @ 60, 75, 100 Hz<ref><translate><!--T:369--> Disclaimer: When displaying 3440 x 1440 @ 75/100Hz resolution via USB-C, if USB-C 3.2 is set to “ON”, the video input will only support YCbCr 4:2:2 format, please check if your graphics card supports it. If USB-C 3.2 is set to “OFF”, the video input can support RGB format, but data transfer & Ethernet speed will be limited to USB 2.0 due to bandwidth limitation.</translate></ref> | ||
* 2560 x 1440 @ 60, 75, 100 Hz | * 2560 x 1440 @ 60, 75, 100 Hz | ||
* 2048 x 1152 @ 60 Hz | * 2048 x 1152 @ 60 Hz | ||
| Line 576: | Line 580: | ||
|- | |- | ||
| style="font-weight:bold; text-align:center;" | <translate> Power</translate><ref><translate>Please use the power adapter from ViewSonic® or an authorized source only.</translate></ref> | | style="font-weight:bold; text-align:center;" | <translate> <!--T:370--> Power</translate><ref><translate><!--T:371--> Please use the power adapter from ViewSonic® or an authorized source only.</translate></ref> | ||
| style="text-align:center;"|Input Voltage | | style="text-align:center;"|Input Voltage | ||
| AC 100-240V, 50/60 Hz (auto switch) | | AC 100-240V, 50/60 Hz (auto switch) | ||
|- | |- | ||
| rowspan="2" style="font-weight:bold; text-align:center;" | <translate> Display Area</translate> | | rowspan="2" style="font-weight:bold; text-align:center;" | <translate> <!--T:372--> Display Area</translate> | ||
| rowspan="2" style="text-align:center;" |Active Size<br />(H x V) | | rowspan="2" style="text-align:center;" |Active Size<br />(H x V) | ||
|799.8 x 344.8 mm | |799.8 x 344.8 mm | ||
| Line 586: | Line 590: | ||
|31.5” x 13.6” | |31.5” x 13.6” | ||
|- | |- | ||
| rowspan="5" style="font-weight:bold; text-align:center;" | <translate> Operating Conditons</translate> | | rowspan="5" style="font-weight:bold; text-align:center;" | <translate> <!--T:373--> Operating Conditons</translate> | ||
| rowspan="2" style="text-align:center;" |Altitude | | rowspan="2" style="text-align:center;" |Altitude | ||
| up to 4.9 km | | up to 4.9 km | ||
| Line 600: | Line 604: | ||
|32° F to 104° F | |32° F to 104° F | ||
|- | |- | ||
| rowspan="5" style="font-weight:bold; text-align:center;" | <translate> Storage Conditions</translate> | | rowspan="5" style="font-weight:bold; text-align:center;" | <translate> <!--T:374--> Storage Conditions</translate> | ||
| rowspan="2" style="text-align:center;" |Altitude | | rowspan="2" style="text-align:center;" |Altitude | ||
| up to 12.1 km | | up to 12.1 km | ||
| Line 614: | Line 618: | ||
| -4° F to 140° F | | -4° F to 140° F | ||
|- | |- | ||
| rowspan="2" style="font-weight:bold; text-align:center;" | <translate> Dimensions</translate> | | rowspan="2" style="font-weight:bold; text-align:center;" | <translate> <!--T:375--> Dimensions</translate> | ||
(with stand) | (with stand) | ||
| rowspan="2" style="text-align:center;" |Physical<br />(W x H x D) | | rowspan="2" style="text-align:center;" |Physical<br />(W x H x D) | ||
| Line 621: | Line 625: | ||
|32.2” x 21” x 9.3” | |32.2” x 21” x 9.3” | ||
|- | |- | ||
| rowspan="2" style="font-weight:bold; text-align:center;" | <translate> Weight</translate> | | rowspan="2" style="font-weight:bold; text-align:center;" | <translate> <!--T:376--> Weight</translate> | ||
(with stand) | (with stand) | ||
| rowspan="2" style="text-align:center;" | Physical | | rowspan="2" style="text-align:center;" | Physical | ||
| Line 628: | Line 632: | ||
|21 lb | |21 lb | ||
|- | |- | ||
| style="font-weight:bold; text-align:center;" | <translate> Wall Mount</translate> | | style="font-weight:bold; text-align:center;" | <translate> <!--T:377--> Wall Mount</translate> | ||
| style="text-align:center;"|Dimensions | | style="text-align:center;"|Dimensions | ||
| 100 x 100 mm | | 100 x 100 mm | ||
|- | |- | ||
| rowspan="2" style="font-weight:bold; text-align:center;" | <translate> Power Consumption</translate> | | rowspan="2" style="font-weight:bold; text-align:center;" | <translate> <!--T:378--> Power Consumption</translate> | ||
| style="text-align:center;" |On<ref><translate>On ECO Mode set to Standard. Power consumption is without audio and with all USB ports loading.</translate></ref> | | style="text-align:center;" |On<ref><translate><!--T:379--> On ECO Mode set to Standard. Power consumption is without audio and with all USB ports loading.</translate></ref> | ||
| 185W (Typical) | | 185W (Typical) | ||
|- | |- | ||
Revision as of 07:19, 7 November 2024
Introduction
Package Contents
- Monitor
- Power Cord
- Video Cable
- USB 2-in-1 Cable
- Quick Start Guide
Note: The cables included in your package may vary depending on your country. Please contact your local reseller for more information.
Product Overview
-
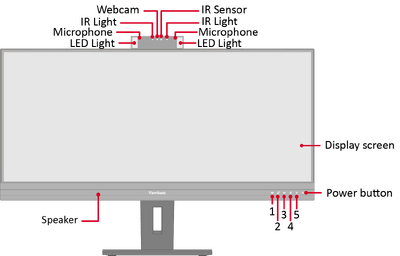 Front View
 -
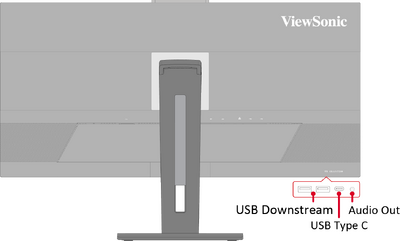 Rear View
I/O Ports

| Number | Description |
|---|---|
| 1 | AC IN |
| 2 | HDMI |
| 3 | DisplayPort |
| 4 | USB Type C |
| 5 | LAN |
| 6 | USB Downstream |
Note: For more information about the 1/2/3/4/5 key and its functions, refer to Hot Keys.
Initial Setup
Installing the Stand

- Place the box on a flat, stable surface and open the front flap of the box to reveal the contents. Remove the top tray.
- Remove the monitor stand’s base and neck. Align and connect the two points on the monitor stand’s base with the monitor stand’s neck.
- Use the captured screw in the monitor stand’s base and secure it to the monitor stand’s neck.
- Align and slide the upper hooks of the monitor stand into the stand mounting slots.Note: Make sure the stand is secure and the quick release tab positively clicks into place.
- Using the stand’s handle, lift the monitor out of the box and into its upright position on a flat, stable surface.
Note: For safety and to ensure optimal performance, please position the monitor on a flat, stable surface. Failure to do so may lead to the monitor falling, causing damage to the monitor itself and/or posing a risk of personal injury.
Removing the Stand and Mounting the Monitor
Refer to the table below for the standard dimensions for mounting kits.
Note: For use only with a UL certified mounting kit/bracket. To obtain a wall mounting kit or height adjustment base, contact ViewSonic® or your local dealer.
| Maximum Loading | Pad Patten (W x H) |
Pad Hole | Screw Specification | Screw Quantity |
|---|---|---|---|---|
| 14 kg | 100 x 100 mm | Ø 5 mm | M4 x 10 mm | 4 screws |
Note: Mounting kits are sold separately.

Important: Before removing the stand, please turn off the monitor, disconnect all cables, and place the monitor on a flat, stable surface with the screen facing down.
- Press and hold the quick release tab and carefully lift the stand.
- Pull down slightly to disengage the hooks and remove the stand.
- Attach the mounting bracket to the VESA mounting holes at the rear of the monitor. Then secure it with four screws (M4 x 10 mm).
- Follow the instructions that come with the purchased mounting kit to mount the monitor.
Using the Security Slot

To help prevent the monitor from being stolen, use a security slot locking device to secure the monitor to a fixed object.
Additionally, fastening the monitor to a wall or fixed object using a security cable can help support the weight of the monitor in order to prevent the monitor from falling over.
Making Connections
Connecting to Power

- Connect the power cord to the AC IN jack at the rear of the monitor.
- Plug the power cord plug into a power outlet.
Display Connection
HDMI

- Connect one end of an HDMI cable to an HDMI port of the monitor.
- Plug the other end of the cable into the HDMI port of your computer.
DisplayPort

- Connect one end of a DisplayPort cable to the DP port of the monitor.
- Plug the other end of the cable into the DisplayPort or Mini DisplayPort port of your computer.
Note: To connect the monitor to the Thunderbolt port (v. 1 & 2) on your Mac, connect the Mini DisplayPort end of a “Mini DisplayPort to DisplayPort cable” to the Thunderbolt output port of your Mac. Then connect the other end of the cable to the DisplayPort port of the monitor.
Type C

- Connect one end of a USB Type C cable to the rear upstream USB Type C port of the monitor.
- Plug the other end of the cable into the full-featured USB port of your computer.
Note:
- For video output use, make sure your USB Type C output device (e.g., laptop) and cable support video signal transmission.
- When you use Type C as the video signal input source, it is recommended to unplug the DisplayPort and HDMI signals to avoid audio output confusion.
USB Connection
The monitor supports two types of USB ports, upstream and downstream. When making connection(s), observe the following guideline.

| USB Type | Connection Type | Description | |
|---|---|---|---|
| Upstream | Type C | Full-featured port: transfers data, audio, video, and power. | |
| Supports: 5V/3A, 9V/3A, 12V/3A, 15V/3A, 20V/4.9A (LPS) charging. | |||
| Downstream | Type A | For peripheral device(s) (e.g., storage device, keyboard, mouse, etc.). | |
| Supports: 5V/2.1A charging and BC 1.2. | |||
| Type C | For peripheral device(s) (e.g., storage device, keyboard, mouse, etc.). | ||
| Supports 5V/3A charging. | |||
Note:
- For video output use, make sure your USB Type C output device (e.g., laptop) and cable support video signal transmission.
- When you use Type C as the video signal input source, it is recommended to unplug the DisplayPort and HDMI cables to avoid audio output confusion.
Using the USB Ports

- To use the downstream USB ports, connect one end of the USB Type C cable to the upstream USB Type C ❶ port of the monitor. Plug the other end of the cable into a USB port of your computer.
- Connect your peripheral device(s) to a downstream USB port (Type A ❷ ) or (Type C ❸ ) of the monitor.
If you are required to connect through either HDMI or DisplayPort, please also use a USB Type C to USB Type A cable to connect to the monitor to enable data transfer.

Ethernet Connection

- Connect one end of your LAN (RJ45) cable to the LAN (RJ45) port of the monitor.
- Plug the other end into your network modem or port.
- Ensure your computer is also connected to the monitor by the rear upstream USB Type C port of the monitor. See USB Connection for more information.
Ethernet Connection When Using USB Type C for Video Input
No further steps are required. If needed, see USB Connection for more information.
Ethernet Connection When Using DisplayPort or HDMI for Video Input
In addition to the DisplayPort or HDMI connection, please also connect your computer to the rear upstream USB Type C port of the monitor to enable data transmission. See Using the USB Ports for more information.
| Active Mode | Left LED | Right LED | |
|---|---|---|---|

|
1GB Bit | Off | Flashing Amber |
| 100M Bit | Flashing Green | Off | |
| 10M Bit | Off | Off | |
Audio Connection

Plug the audio jack of the audio device into the Audio Out port of the monitor.
Note: The monitor is also equipped with dual speakers.
There are two audio output sources when connected to USB upstream. Users can choose according to their preference.
| Audio Output Source | Description |
|---|---|
| Echo Cancelling Speakerphone (Windows OS) |
Monitor and operating system volume controls can be synchronized. |
| USB (macOS) | |
| HD Audio Driver for Display Audio (Windows OS) |
The volume of the monitor and operating system are controlled independently. |
| HDMI or DisplayPort (macOS) |
Using the Monitor
Adjusting the Viewing Angle
Height Adjustment

Lower or raise the monitor to the desired height (0 to 110 mm).
Note: When adjusting, press down firmly along the adjustment track.
Swivel Adjustment

Swivel the monitor to the left or right for the desired viewing angle (± 60˚).
Tilt Adjustment

Tilt the monitor forwards or backwards to the desired viewing angle (-5˚ to 40˚).
Note:
- When adjusting, support the stand firmly with one hand while tilting the monitor forwards or backwards with the other hand.
- The monitor must be lifted to the highest position, then it can support 40° tilt.
Turning the Monitor On/Off

- Plug the connected power adapter into a power outlet.
- Press the Power button to turn on the monitor.
- To turn the monitor off, press the Power button again.
Note: The monitor will still consume some power as long as the power cord is connected to the power outlet. If the monitor is not being used for a long period of time, please disconnect the power plug from the power outlet.
Using the Webcam
- If Connected by DisplayPort or HDMI:
To activate the webcam, ensure the monitor is also connected to your computer via the USB upstream port.
- If Connected by USB Type C:
The webcam will already be activated and ready for use.
Uncovering and Covering the Webcam (Privacy Mode)
-
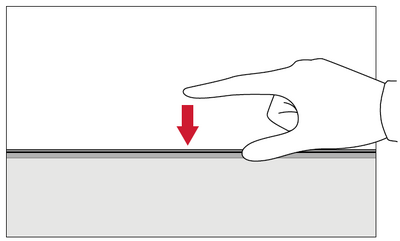 Uncover
To pop-up and uncover the webcam, press the top of the webcam. -
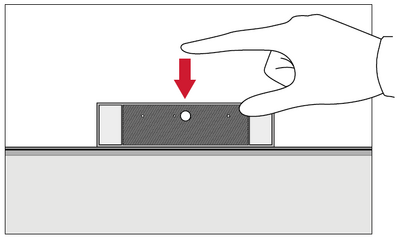 Cover
Cover
To cover the webcam, press the top of the webcam.
Using the Monitor’s Webcam for Windows Hello
You can use Windows Hello facial recognition to sign-in with the monitor’s webcam. Please refer to Windows’ official website for Windows Hello settings.
Tilting the Webcam
When the webcam is uncovered, tilt it forwards or backwards to adjust the viewing angle (-5° to 5°).

Using the Control Panel Keys
Use the Control Panel Keys (1/2/3/4/5) to adjust the ViewMode and LED Fill Light, mute the Speaker and Microphone, and navigate the On-Screen Display (OSD) Menu.

ViewMode
Press the 1 key to select one of the preset color settings.

LED Fill Light
Press the 2 key to turn on the LED lights.

Speaker Mute
Press the 3 key to mute/unmute the speaker.
Microphone Mute
Press the 4 key to mute/unmute the microphone.
Main Settings
Press the 5 key to decrease/increase the Volume level, adjust the LED Fill Light, and enter the On-Screen Display (OSD) Menu.

Hot Keys
When the On-Screen Display (OSD) Menu is off, you can quickly access special functions by using the Control Panel Keys.
| Key | Description |
|---|---|
| 2 + 3 | Press and hold the keys to lock/unlock the OSD Menu. When the menu appears on the screen, continue holding both keys for 10 seconds to lock/unlock the OSD Menu  If the OSD Menu is locked, the below message will appear on the screen:  |
| 2 + 4 | Press and hold the keys to lock/unlock the Power button. When the menu appears on the screen, continue holding the key for 10 seconds to lock/unlock the Power button.  If the Power button is locked, the below message will appear on the screen.  |
| 3 + 5 | Press and hold the keys to display/hide the boot up screen when the device is turned on.  |
Configuring the Settings
General Operations

- Press the 5 key to display the Main Settings menu, then press the 4 key to enter the OSD Menu.
- Press the 1 or 2 key to select the main menu. Then press the 3 key to enter the selected menu.
- Press the 1 or 2 key to select the desired menu option. Then press the 3 key to enter the sub-menu.
- Press the 1 or 2 key to adjust/select the setting. Then press the 3 key to confirm.
- Press the 4 key to return to the previous menu.


Note: Certain menu option adjustments do not require the user to press the 3 key to confirm the selection. Follow the key guide that appears on the screen to select the option or make adjustments.
Menu Options
Input Select

- Press the 5 key to display the Main Settings menu, then press the 4 key to enter the OSD Menu.
- Press the 1 or 2 key to select Input Select. Then press the 3 key to enter the Input Select menu.
- Press the 1 or 2 key to select the desired input source. Then press the 3 key to confirm the selection.
Coference Mode

- Press the 5 key to display the Main Settings menu, then press the 4 key to enter the OSD Menu.
- Press the 1 or 2 key to select Conference Mode. Then press the 3 key to enter the Conference Mode menu.
- Press the 1 or 2 key to select the menu option. Then press the 3 key to enter its sub-menu.
- Press the 1 or 2 key to adjust/select the setting. Then press the 3 key to confirm (if applicable).
| Menu Option | Description |
|---|---|
| LED Fill Light | Adjust the LED lighting values. |
| Speaker Volume | Adjust the speaker volume level. |
| Speaker Mute | Mute/unmute the speaker. |
| Microphone Mute | Mute/unmute the microphone. |
ViewMode

- Press the 5 key to display the Main Settings menu, then press the 4 key to enter the OSD Menu.
- Press the 1 or 2 key to select ViewMode. Then press the 3 key to enter the ViewMode menu.
- Press the 1 or 2 key to select the setting. Then press the 3 key to confirm the selection.
Note: Some sub-menu options may have another sub-menu. To enter the respective sub-menu, press the 3 key. Follow the key guide that appears on the screen to select the option or make adjustments.
| Menu Option | Description |
|---|---|
| Off | Disable the function. |
| Office | Select this option for office applications. |
| Movie | Select this option for watching movies. |
| MAC | Select this option when connecting the moniter to Mac computers. |
| Mono | Select this option for monichrome. |
| Game | Select this option for playing games. |
Color Adjust
Note: Some sub-menus may not be adjustable depending on the user’s custom settings.

- Press the 5 key to display the Main Settings menu, then press the 4 key to enter the OSD Menu.
- Press the 1 or 2 key to select Color Adjust. Then press the 3 key to enter the Color Adjust menu.
- Press the 1 or 2 key to select the menu option. Then press the 3 key to enter its sub-menu.
- Press the 1 or 2 key to select the setting. Then press the 3 key to confirm the selection.
Note: Some sub-menu options may have another sub-menu. To enter the respective sub-menu, press the 3 key. Follow the key guide that appears on the bottom of the screen to select the option or make adjustments.
| Menu Option | Description |
|---|---|
| Contrast/Brightness | Contrast Adjust the degree of difference between the lightest and darkest parts of the picture and change the amount of black and white in the image. |
Brightness Adjust the background black levels of the screen image. | |
| Color Temperature | Select the color temperature setting.
|
| Color Space | Allows users to choose which color space they would like to use for monitor color output.
|
| Color Range | The monitor can detect the input signal color range automatically. You can manually change the color range options to fit the correct color range if the colors are not displayed correctly.
|
| Gamma | Manually adjust the brightness level of the monitor’s grayscale levels. |
Manual Image Adjust

- Press the 5 key to display the Main Settings menu, then press the 4 key to enter the OSD Menu.
- Press the 1 or 2 key to select Manual Image Adjust. Then press the 3 key to enter the Manual Image Adjust menu.
- Press the 1 or 2 key to select the menu option. Then press the 3 key to enter its sub-menu.
- Press the 1 or 2 key to adjust/select the setting. Then press the 3 key to confirm (if applicable).
| Menu Option | Description |
|---|---|
| Sharpness | Adjust the sharpness and picture quality of the monitor. |
| Aspect Ratio | Select the aspect ratio of the monitor. |
| Overscan | SEnable this option to automatically enlarge the original picture horizontally and vertically to an equal aspect ratio that fills the screen. |
Setup Menu

- Press the 5 key to display the Main Settings menu, then press the 4 key to enter the OSD Menu.
- Press the 1 or 2 key to select Setup Menu. Then press the 3 key to enter the Setup Menu menu.
- Press the 1 or 2 key to select the menu option. Then press the 3 key to enter its sub-menu.
- Press the 1 or 2 key to select the setting. Then press the 3 key to confirm the selection.
Note: Some sub-menu options may have another sub-menu. To enter the respective sub-menu, press the 3 key. Follow the key guide that appears on the screen to select the option or make adjustments.
| Menu Option | Description |
|---|---|
| Language Select | Select an available language for the OSD Menu. |
| Resolution Notice | Enable this option to allow the system to inform users that the current viewing resolution is not the correct native resolution. |
| Information | Display the monitor information. |
| OSD Timeout | Set the length of time the OSD Menu remains on screen. |
| OSD Background | Show/Hide the OSD background when the OSD Menu appears on the screen. |
| Power Indicator | Set the Power Indicator On or Off. If the setting is set to On, the power indicator lights blue when the device is turned on. |
| Auto Power Off | Enable this option to allow the monitor to automatically turn off after a certain amount of time. |
| Sleep | Set the amount of idle time before the monitor enters Sleep mode. |
| ECO Mode | Choose between various modes, based on power consumption. |
| DisplayPort 1.2 | If the connected device does not support DisplayPort 1.4, the DisplayPort version can be changed to 1.2. |
| HDMI Version | If the connected device does not support HDMI 2.0, the HDMI version can be changed to 1.4. |
| USB 3.2 | Select if the USB Type C port will support USB 2.0 or USB 3.2. |
| DDC/CI | Enable this option to allow the monitor control via the graphics card. |
| Auto Detect | Automatically detect the input signal. |
| All Recall | Resets all settings to their default values. |
Appendix
Product Specifications
| Item | Category | Specifications |
|---|---|---|
| LCD | Type | a-Si TFT Active Maxtix, 3440 x 1440 LCD
0.23 (H)mm x 0.23 (V)mm pixel pitch |
| Display Size | 86.4 cm | |
| 34” viewable | ||
| Color Filter | RGB Vertical Stripe | |
| Glass Surface | Anti-Glare (Haze 25%), Hard Coating (3H) | |
| Input Signal | Video Sync | TMDS digital (100 Ω)
|
| Compatibility | PC | up to 3440 x 1440 |
| Macintosh | up to 3440 x 1440 | |
| Resolution and Timings[1] | Recommended | 3440 x 1440 @ 60 Hz |
| Supported |
| |
| Power[3] | Input Voltage | AC 100-240V, 50/60 Hz (auto switch) |
| Display Area | Active Size (H x V) |
799.8 x 344.8 mm |
| 31.5” x 13.6” | ||
| Operating Conditons | Altitude | up to 4.9 km |
| up to 16,404 ft | ||
| Relative Humidity | 20% to 90% (non-condensing) | |
| Temperature | 0° C to 40° C | |
| 32° F to 104° F | ||
| Storage Conditions | Altitude | up to 12.1 km |
| up to 40,000 ft | ||
| Relative Humidity | 5% to 90% (non-condensing) | |
| Temperature | -20° C to 60° C | |
| -4° F to 140° F | ||
| Dimensions
(with stand) |
Physical (W x H x D) |
817.4 x 533.8 x 236.2 mm |
| 32.2” x 21” x 9.3” | ||
| Weight
(with stand) |
Physical | 9.5 kg |
| 21 lb | ||
| Wall Mount | Dimensions | 100 x 100 mm |
| Power Consumption | On[4] | 185W (Typical) |
| Off | < 0.3W (Maximum) |
- ↑ Do not set the graphics card in your computer to exceed these timing modes; doing so may result in permanent damage to the display.
- ↑ Disclaimer: When displaying 3440 x 1440 @ 75/100Hz resolution via USB-C, if USB-C 3.2 is set to “ON”, the video input will only support YCbCr 4:2:2 format, please check if your graphics card supports it. If USB-C 3.2 is set to “OFF”, the video input can support RGB format, but data transfer & Ethernet speed will be limited to USB 2.0 due to bandwidth limitation.
- ↑ Please use the power adapter from ViewSonic® or an authorized source only.
- ↑ On ECO Mode set to Standard. Power consumption is without audio and with all USB ports loading.
| The terms HDMI, HDMI High-Definition Multimedia Interface, HDMI trade dress and the HDMI Logos are trademarks or registered trademarks of HDMI Licensing Administrator, Inc. |
On-Screen Display (OSD) Menu Tree
| Sub-menu | Menu Option | ||
|---|---|---|---|
| LED Fill Light | On | Color Temperature | Warm |
| Day Light | |||
| Cool | |||
| Brightness | High | ||
| Medium | |||
| Low | |||
| Off | |||
| Speaker Volume | (-/+, 0~100)/1 | ||
| Speaker Mute | On | ||
| Off | |||
| Microphone Mute | On | ||
| Off | |||
| Sub-menu | Menu Option | |||
|---|---|---|---|---|
| Off | ||||
| Office | Web | |||
| Text | ||||
| Custom 1/2/3 | Low Input Lag | On/Off | ||
| Black Stabilization | (-/+, 0~100)/10 | |||
| Advanced DCR | (-/+, 0~100)/25 | |||
| Response Time | Standard | |||
| Advanced | ||||
| Ultra Fast | ||||
| Hue | Red | (-/+, 0~100)/1 | ||
| Green | (-/+, 0~100)/1 | |||
| Blue | (-/+, 0~100)/1 | |||
| Cyan | (-/+, 0~100)/1 | |||
| Magenta | (-/+, 0~100)/1 | |||
| Yellow | (-/+, 0~100)/1 | |||
| Saturation | Red | (-/+, 0~100)/1 | ||
| Green | (-/+, 0~100)/1 | |||
| Blue | (-/+, 0~100)/1 | |||
| Cyan | (-/+, 0~100)/1 | |||
| Magenta | (-/+, 0~100)/1 | |||
| Yellow | (-/+, 0~100)/1 | |||
| Rename | ||||
| Recall | ||||
| Movie | ||||
| MAC | ||||
| Mono | ||||
| Game | FPS 1 | |||
| FPS 2 | ||||
| RTS | ||||
| MOBA | ||||
| Sub-menu | Menu Option | ||
|---|---|---|---|
| Contrast/Brightness | Contrast | (-/+, 0~100)/1 | |
| Brightness | (-/+, 0~100)/1 | ||
| Color Temperature | Bluish | ||
| Cool | |||
| Native | |||
| Warm | |||
| User Color | Red | (-/+, 0~100)/1 | |
| Green | (-/+, 0~100)/1 | ||
| Blue | (-/+, 0~100)/1 | ||
| Color Space | Auto | ||
| RGB | |||
| YUV | |||
| Color Range | Auto | ||
| Full Range | |||
| Limited Range | |||
| Gamma | 1.8 | ||
| 2.0 | |||
| 2.2 | |||
| 2.4 | |||
| 2.6 | |||
| 2.8 | |||
| Sub-menu | Menu Option |
|---|---|
| Sharpness | (-/+, 0~100)/25 |
| Aspect Ratio | 4:3 |
| Full Screen | |
| Overscan | On |
| Off |
| Sub-menu | Menu Option | |
|---|---|---|
| Language | English | |
| Français | ||
| Deutsch | ||
| Español | ||
| Italiano | ||
| Suomi | ||
| Русский | ||
| Türkçe | ||
| 日本語 | ||
| 한국어 | ||
| 繁體中文 | ||
| 简体中文 | ||
| Česká | ||
| Svenska | ||
| Resolution Notice | On | |
| Off | ||
| Information | ||
| OSD Timeout | (-/+, 5/15/30/60) | |
| OSD Background | On | |
| Off | ||
| Power Indicator | On | |
| Off | ||
| Auto Power Off | On | |
| Off | ||
| Sleep | 30 minutes | |
| 45 minutes | ||
| 60 minutes | ||
| 120 minutes | ||
| Off | ||
| ECO Mode | Standard | |
| Optimize | ||
| Conserve | ||
| Energy Saving | On | |
| Off | ||
| DisplayPort 1.2 | On | |
| Off | ||
| HDMI Version | 1.4 | |
| 2.0 | ||
| USB 3.2 | On | |
| Off | ||
| DDC/CI | On | |
| Off | ||
| Auto Detect | On | |
| Off | ||
| All Recall | ||
VG3457VC_UG_ENG_1a_20240904