
VController Using the Application: Difference between revisions
From ViewSonic Documentation
No edit summary |
No edit summary |
||
| Line 40: | Line 40: | ||
:Press the '''On Button'''[[File:VController_PowerOn_Icon.jpg|On Button]] to turn on the monitor. <br /> | :Press the '''On Button'''[[File:VController_PowerOn_Icon.jpg|On Button]] to turn on the monitor. <br /> | ||
:Press the '''Off Button'''[[File:VController_PowerOff_Icon.jpg|Off Button]] to turn off the monitor. | :Press the '''Off Button'''[[File:VController_PowerOff_Icon.jpg|Off Button]] to turn off the monitor. | ||
:{| class="wikitable" style="font-weight:bold;" | :{| class="wikitable" style="font-weight:bold;" width="50%" | ||
|- style="text-align:center; background-color:#c41230; color:#ffffff; font-weight:bold;" | |- style="text-align:center; background-color:#c41230; color:#ffffff; font-weight:bold;" | ||
! style="text-align:center; background-color:#c41230; color:#ffffff; font-weight:bold;" | Icon | ! style="text-align:center; background-color:#c41230; color:#ffffff; font-weight:bold;" | Icon | ||
| Line 67: | Line 67: | ||
<li>Enter the IP address of the monitor or projector in the IP address field.</li> | <li>Enter the IP address of the monitor or projector in the IP address field.</li> | ||
</ol> | </ol> | ||
:{| class="wikitable" style="font-weight:bold | :{| class="wikitable" style="font-weight:bold" width="50%" | ||
|- style="text-align:center; background-color:#c41230; color:#ffffff; font-weight:bold;" | |- style="text-align:center; background-color:#c41230; color:#ffffff; font-weight:bold;" | ||
! style="text-align:center; background-color:#c41230; color:#ffffff; font-weight:bold;" | Icon | ! style="text-align:center; background-color:#c41230; color:#ffffff; font-weight:bold;" | Icon | ||
| Line 93: | Line 93: | ||
| style="font-weight:normal; text-align:left" | Close IP group windows. | | style="font-weight:normal; text-align:left" | Close IP group windows. | ||
|} | |} | ||
=Setting= | =Setting/Getting= | ||
==Setting Button== | |||
:{| class="wikitable" style="font-weight:bold" width="50%" | |||
|- style="text-align:center; background-color:#c41230; color:#ffffff; font-weight:bold;" | |||
! style="text-align:center; background-color:#c41230; color:#ffffff; font-weight:bold;" | Icon | |||
! style="text-align:center; background-color:#c41230; color:#ffffff; font-weight:bold;" | Description | |||
|-style="text-align:center;" | |||
| [[File:vController_Source_Icon_Set.jpg]] | |||
| style="font-weight:normal; text-align:left" | Press to set the RS232 or LAN commands. | |||
|-style="text-align:center;" | |||
| [[File:vController_Source_Icon_Green_Set.jpg]] | |||
| style="font-weight:normal; text-align:left" | Command was successfully read. | |||
|- style="text-align:center;" | |||
| [[File:vControllervController_Source_Icon_Red_Set.jpg]] | |||
| style="font-weight:normal; text-align:left;" | Command was not set / command is not supported. | |||
|-style="text-align:center;" | |||
| [[File:vControllervController_Source_Icon_Yellow_Set.jpg]] | |||
| style="font-weight:normal; text-align:left" | Command is still processing. | |||
|} | |||
[[Category:VController]] | |||
Revision as of 09:52, 16 June 2022
Introduction
vController 2.0 integrates RS232 and LAN command for monitors and projectors.
- Start Up
- Setting
- Schedule
Start Up
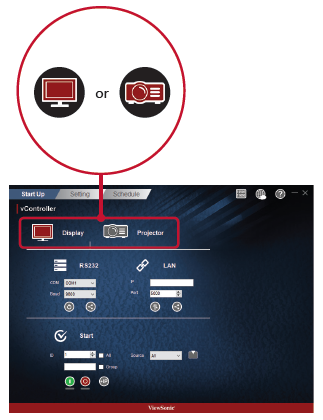
Select Drive
- Press the Monitor Icon
 to control the monitor or the Projector Icon
  to control the projector.


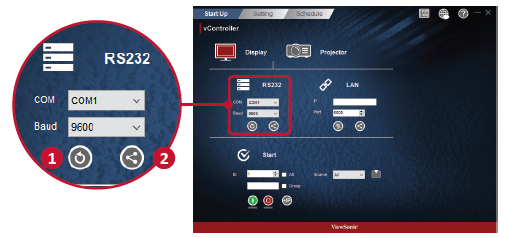
RS232 settings
- Press the Return Button
 to search for the RS232 connection ports and then select a corresponding hardware connection port.
 - Default baud rate is 9600.
- Press the Share Button
 to connect to the RS232. When the RS232 has been successfully connected, the button will turn green.


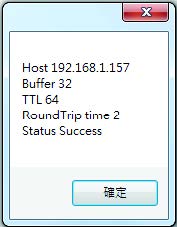
Network Settings
- Enter the IP address of the monitor in the IP address field.
- When the network settings interface is opened, press the Ping Button
 to check if the connection is successful.
 - Default port number is 5000.
- Press the Share Button to connect to the RS232. When the RS232 has been successfully connected, the button will turn green.


Start
Monitor ID
- Create ID numbers when connecting to monitors via RS232C. A unique ID should be created for each monitor. Check All when connecting to multiple monitors.
- NOTE: Only monitors support ID numbers. Projectors don't use ID numbers.
ID Group
- Check Group.
- Enter ID numbers in the text field.
On/Off Buttons
- Press the On Button
 to turn on the monitor.
 - Press the Off Button
 to turn off the monitor.


Icon Description
Monitor has turned on successfully. 
Monitor has failed to turn on / monitor's status is unknown.
Monitor has turned off successfully. 
Monitor has failed to turn off / monitor's status is unknown.


Source Menu
- Select video source with the pull-down menu
- Press the Source Button
 to switch the input signal.

IP Group
- Press the IP Button
 to set the IP group.
- Enter the IP address of the monitor or projector in the IP address field.

Icon Description 
Add IP address into group. 
Remove IP address from group. 
Move up the focus IP address. 
Move down the focus IP address. 
Enable all IP address. 
Disable all IP address. 
Close IP group windows.


Setting/Getting
Setting Button
Icon Description 
Press to set the RS232 or LAN commands. 
Command was successfully read. 
Command was not set / command is not supported. 
Command is still processing.


