
VController Using the Application: Difference between revisions
From ViewSonic Documentation
No edit summary |
No edit summary |
||
| Line 12: | Line 12: | ||
*'''Setting''' | *'''Setting''' | ||
*'''Schedule''' | *'''Schedule''' | ||
=Start Up= | |||
==Select Drive== | |||
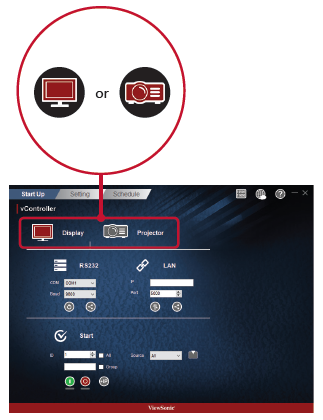
<ol><li>Press the '''Monitor Icon''' [[File:VController_Monitor_Icon.jpg|Monitor Icon]] to control the monitor or the '''Projector Icon''' [[File:VController_Projector_Icon.jpg|Projector Icon]] to control the projector.<br /> | <ol><li>Press the '''Monitor Icon''' [[File:VController_Monitor_Icon.jpg|Monitor Icon]] to control the monitor or the '''Projector Icon''' [[File:VController_Projector_Icon.jpg|Projector Icon]] to control the projector.<br /> | ||
[[File:VController_Start_Up1.PNG]]</li></ol> | [[File:VController_Start_Up1.PNG]]</li></ol> | ||
==RS232 settings== | |||
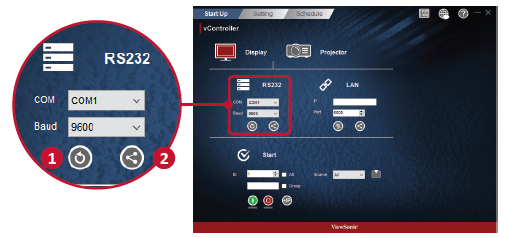
<ol><li>Press the '''Return Button''' [[File:VController_Return_Icon.jpg|Return Icon]] to search for the RS232 connection ports and then select a corresponding hardware connection port.</li> | <ol><li>Press the '''Return Button''' [[File:VController_Return_Icon.jpg|Return Icon]] to search for the RS232 connection ports and then select a corresponding hardware connection port.</li> | ||
*Default baud rate is 9600. | *Default baud rate is 9600. | ||
<li>Press the '''Share Button''' [[File:VController_Share_Icon.jpg|Share Icon]] to connect to the RS232. When the RS232 has been successfully connected, the button will turn green. | <li>Press the '''Share Button''' [[File:VController_Share_Icon.jpg|Share Icon]] to connect to the RS232. When the RS232 has been successfully connected, the button will turn green. | ||
[[File:VController_Start_Up2.PNG]]</li></ol> | [[File:VController_Start_Up2.PNG]]</li></ol> | ||
==Network Settings== | |||
<ol><li>Enter the IP address of the monitor in the IP address field.</li> | <ol><li>Enter the IP address of the monitor in the IP address field.</li> | ||
[[File:VController_Network1.PNG]] | [[File:VController_Network1.PNG]] | ||
| Line 29: | Line 29: | ||
<li>Press the '''Share Button''' [[File:VController_Share_Icon.jpg|Share Icon]] to connect to the RS232. When the RS232 has been successfully connected, the button will turn green.</li></ol> | <li>Press the '''Share Button''' [[File:VController_Share_Icon.jpg|Share Icon]] to connect to the RS232. When the RS232 has been successfully connected, the button will turn green.</li></ol> | ||
</ol> | </ol> | ||
==Start== | |||
===Monitor ID=== | |||
:Create ID numbers when connecting to monitors via RS232C. A unique ID should be created for each monitor. Check '''All''' when connecting to multiple monitors. | |||
:'''NOTE:''' Only monitors support ID numbers. Projectors don't use ID numbers. | |||
===ID Group=== | |||
<ol><li>Check '''Group'''.</li> | |||
<li>Enter ID numbers in the text field.</li> | |||
</ol> | |||
===On/Off Buttons=== | |||
:Press the '''On Button'''[[File:VController_PowerOn_Icon.jpg|On Button]] to turn on the monitor. <br /> | |||
:Press the '''Off Button'''[[File:VController_PowerOff_Icon.jpg|Off Button]] to turn off the monitor. | |||
:{| class="wikitable" style="font-weight:bold;" | |||
|- style="text-align:center; background-color:#c41230; color:#ffffff; font-weight:bold;" | |||
! style="text-align:center; background-color:#c41230; color:#ffffff; font-weight:bold;" | Icon | |||
! style="text-align:center; background-color:#c41230; color:#ffffff; font-weight:bold;" | Description | |||
|- | |||
| [[File:VController_PowerOn_Icon.jpg]] | |||
| style="font-weight:normal;" | Monitor has turned on successfully. | |||
|- | |||
| [[File:VController_PowerOn_Icon_GreenLine.jpg]] | |||
| style="font-weight:normal;" | Monitor has failed to turn on / monitor's status is unknown. | |||
|- style="text-align:center;" | |||
| [[File:VController_PowerOff_Icon.jpg]] | |||
| style="font-weight:normal; text-align:left;" | Monitor has turned off successfully. | |||
|- | |||
| [[File:VController_PowerOff_Icon_RedLine.jpg]] | |||
| style="font-weight:normal;" | Monitor has failed to turn off / monitor's status is unknown. | |||
|} | |||
===Source Menu=== | |||
<ol><li>Select video source with the pull-down menu</li> | |||
<li>Press the '''Source Button'''[[File:VController_Source_Icon.jpg]] to switch the input signal. | |||
</ol> | |||
===IP Group=== | |||
<ol><li>Press the '''IP Button'''[[File:VController_IPGroup_Icon.jpg]] to set the IP group. <br / > | |||
[[File:VController_Network2.jpg]]</li> | |||
<li>Enter the IP address of the monitor or projector in the IP address field.</li> | |||
</ol> | |||
:{| class="wikitable" style="font-weight:bold;" | |||
|- style="text-align:center; background-color:#c41230; color:#ffffff; font-weight:bold;" | |||
! style="text-align:center; background-color:#c41230; color:#ffffff; font-weight:bold;" | Icon | |||
! style="text-align:center; background-color:#c41230; color:#ffffff; font-weight:bold;" | Description | |||
|- | |||
| [[File:vController_Add_Icon.jpg]] | |||
| style="font-weight:normal;" | Add IP address into group. | |||
|- | |||
| [[File:vController_Remove_Icon.jpg]] | |||
| style="font-weight:normal;" | Remove IP address from group. | |||
|- | |||
| [[File:vController_Up__Iconn.jpg]] | |||
| style="font-weight:normal; text-align:left;" | Move up the focus IP address. | |||
|- | |||
| [[File:vController_Down_Icon.jpg]] | |||
| style="font-weight:normal;" | Move down the focus IP address. | |||
|- | |||
| [[File:vController_Check_Icon.jpg]] | |||
| style="font-weight:normal;" | Enable all IP address. | |||
|- | |||
| [[File:vController_Disable_Icon.jpg]] | |||
| style="font-weight:normal;" | Disable all IP address. | |||
|- | |||
| [[File:vController_X_Icon.jpg]] | |||
| style="font-weight:normal;" | Close IP group windows. | |||
|} | |||
Revision as of 06:45, 16 June 2022
User Interface
vController 2.0 integrates RS232 and LAN command for monitors and projectors.
- Start Up
- Setting
- Schedule
Start Up
Select Drive
- Press the Monitor Icon
 to control the monitor or the Projector Icon
  to control the projector.


RS232 settings
- Press the Return Button
 to search for the RS232 connection ports and then select a corresponding hardware connection port.
 - Default baud rate is 9600.
- Press the Share Button
 to connect to the RS232. When the RS232 has been successfully connected, the button will turn green.


Network Settings
- Enter the IP address of the monitor in the IP address field.
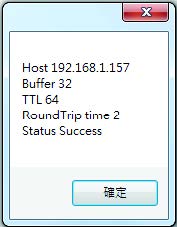
- When the network settings interface is opened, press the Ping Button
 to check if the connection is successful.
 - Default port number is 5000.
- Press the Share Button to connect to the RS232. When the RS232 has been successfully connected, the button will turn green.


Start
Monitor ID
- Create ID numbers when connecting to monitors via RS232C. A unique ID should be created for each monitor. Check All when connecting to multiple monitors.
- NOTE: Only monitors support ID numbers. Projectors don't use ID numbers.
ID Group
- Check Group.
- Enter ID numbers in the text field.
On/Off Buttons
- Press the On Button
 to turn on the monitor.
 - Press the Off Button
 to turn off the monitor.


Icon Description
Monitor has turned on successfully. 
Monitor has failed to turn on / monitor's status is unknown.
Monitor has turned off successfully. 
Monitor has failed to turn off / monitor's status is unknown.


Source Menu
- Select video source with the pull-down menu
- Press the Source Button
 to switch the input signal.

IP Group
- Press the IP Button
 to set the IP group.
- Enter the IP address of the monitor or projector in the IP address field.

Icon Description 
Add IP address into group. 
Remove IP address from group. File:VController Up Iconn.jpg Move up the focus IP address. 
Move down the focus IP address. 
Enable all IP address. 
Disable all IP address. 
Close IP group windows.


