
VController Using the Application: Difference between revisions
From ViewSonic Documentation
Created page with "<noinclude> {{Sticky_Menu_Projector_Software |1=vController_Initial_Setup |2=vController_Using_the_Application |3=vController_Advanced_Features |4=vController_Appendix }} </no..." |
No edit summary |
||
| Line 9: | Line 9: | ||
=User Interface= | =User Interface= | ||
vController 2.0 integrates RS232 and LAN command for monitors and projectors. | vController 2.0 integrates RS232 and LAN command for monitors and projectors. | ||
*'''Start Up''' | |||
*'''Setting''' | |||
*'''Schedule''' | |||
==Start Up== | ==Start Up== | ||
===Select Drive=== | ===Select Drive=== | ||
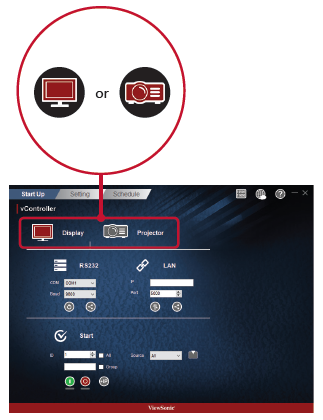
Press the '''Monitor Icon''' [[File:VController_Monitor_Icon.jpg|Monitor Icon]] to control the monitor or the '''Projector Icon''' [[File:VController_Projector_Icon.jpg|Projector Icon]] to control the projector.<br /> | <ol><li>Press the '''Monitor Icon''' [[File:VController_Monitor_Icon.jpg|Monitor Icon]] to control the monitor or the '''Projector Icon''' [[File:VController_Projector_Icon.jpg|Projector Icon]] to control the projector.<br /> | ||
[[File:VController_Start_Up1.PNG | [[File:VController_Start_Up1.PNG]]</li></ol> | ||
===RS232 settings=== | ===RS232 settings=== | ||
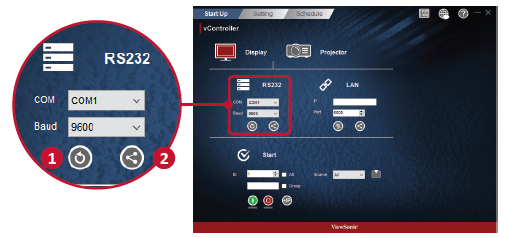
<ol><li>Press the '''Return Button''' [[File:VController_Return_Icon.jpg|Return Icon]] to search for the RS232 connection ports and then select a corresponding hardware connection port.</li> | <ol><li>Press the '''Return Button''' [[File:VController_Return_Icon.jpg|Return Icon]] to search for the RS232 connection ports and then select a corresponding hardware connection port.</li> | ||
*Default baud rate is 9600. | *Default baud rate is 9600. | ||
<li>Press the '''Share Button''' [[File:VController_Share_Icon.jpg|Share Icon]] to connect to the RS232. When the RS232 has been successfully | <li>Press the '''Share Button''' [[File:VController_Share_Icon.jpg|Share Icon]] to connect to the RS232. When the RS232 has been successfully connected, the button will turn green. | ||
connected, the button will turn green.</li></ol> | [[File:VController_Start_Up2.PNG]]</li></ol> | ||
[[File: | ===Network Settings=== | ||
<ol><li>Enter the IP address of the monitor in the IP address field.</li> | |||
[[File:VController_Network1.PNG]] | |||
<li>When the network settings interface is opened, press the '''Ping Button''' [[File:VController_Ping_Icon.jpg|Ping Icon]] to check if the connection is successful.</li> | |||
*Default port number is 5000. | |||
[[File:VController_Network2.jpg]] | |||
<li>Press the '''Share Button''' [[File:VController_Share_Icon.jpg|Share Icon]] to connect to the RS232. When the RS232 has been successfully connected, the button will turn green.</li></ol> | |||
</ol> | |||
Revision as of 05:48, 16 June 2022
User Interface
vController 2.0 integrates RS232 and LAN command for monitors and projectors.
- Start Up
- Setting
- Schedule
Start Up
Select Drive
- Press the Monitor Icon
 to control the monitor or the Projector Icon
  to control the projector.


RS232 settings
- Press the Return Button
 to search for the RS232 connection ports and then select a corresponding hardware connection port.
 - Default baud rate is 9600.
- Press the Share Button
 to connect to the RS232. When the RS232 has been successfully connected, the button will turn green.


Network Settings
- Enter the IP address of the monitor in the IP address field.
- When the network settings interface is opened, press the Ping Button
 to check if the connection is successful.
 - Default port number is 5000.
- Press the Share Button to connect to the RS232. When the RS232 has been successfully connected, the button will turn green.


