
VController Using the Application: Difference between revisions
From ViewSonic Documentation
No edit summary |
No edit summary |
||
| Line 16: | Line 16: | ||
<ol><li>Press the '''Monitor Icon''' [[File:VController_Monitor_Icon.jpg|Monitor Icon]] to control the monitor or the '''Projector Icon''' [[File:VController_Projector_Icon.jpg|Projector Icon]] to control the projector.<br /> | <ol><li>Press the '''Monitor Icon''' [[File:VController_Monitor_Icon.jpg|Monitor Icon]] to control the monitor or the '''Projector Icon''' [[File:VController_Projector_Icon.jpg|Projector Icon]] to control the projector.<br /> | ||
[[File:VController_Start_Up1.PNG]]</li></ol> | [[File:VController_Start_Up1.PNG]]</li></ol> | ||
==RS232 | ==RS232 Settings== | ||
<ol><li>Press the '''Return Button''' [[File:VController_Return_Icon.jpg|Return Icon]] to search for the RS232 connection ports and then select a corresponding hardware connection port.</li> | <ol><li>Press the '''Return Button''' [[File:VController_Return_Icon.jpg|Return Icon]] to search for the RS232 connection ports and then select a corresponding hardware connection port.</li> | ||
*Default baud rate is 9600. | *Default baud rate is 9600. | ||
| Line 40: | Line 40: | ||
:Press the '''On Button'''[[File:VController_PowerOn_Icon.jpg|On Button]] to turn on the monitor. <br /> | :Press the '''On Button'''[[File:VController_PowerOn_Icon.jpg|On Button]] to turn on the monitor. <br /> | ||
:Press the '''Off Button'''[[File:VController_PowerOff_Icon.jpg|Off Button]] to turn off the monitor. | :Press the '''Off Button'''[[File:VController_PowerOff_Icon.jpg|Off Button]] to turn off the monitor. | ||
:{| class="wikitable | :{| class="wikitable" width="50%" | ||
|- style="text-align:center; background-color:#c41230; color:#ffffff; font-weight:bold;" | |- style="text-align:center; background-color:#c41230; color:#ffffff; font-weight:bold;" | ||
! style="text-align:center; background-color:#c41230; color:#ffffff; font-weight:bold;" | Icon | ! style="text-align:center; background-color:#c41230; color:#ffffff; font-weight:bold;" | Icon | ||
! style="text-align:center; background-color:#c41230; color:#ffffff; font-weight:bold;" | Description | ! style="text-align:center; background-color:#c41230; color:#ffffff; font-weight:bold;" | Description | ||
|- | |- | ||
| [[File:VController_PowerOn_Icon.jpg]] | |style="text-align:center;|[[File:VController_PowerOn_Icon.jpg]] | ||
|Monitor has turned on successfully. | |||
|- | |- | ||
| [[File:VController_PowerOn_Icon_GreenLine.jpg]] | |style="text-align:center;|[[File:VController_PowerOn_Icon_GreenLine.jpg]] | ||
|Monitor has failed to turn on / monitor's status is unknown. | |||
|- style="text-align:center; | |- | ||
| [[File:VController_PowerOff_Icon.jpg]] | |style="text-align:center;|[[File:VController_PowerOff_Icon.jpg]] | ||
|Monitor has turned off successfully. | |||
|- | |- | ||
| [[File:VController_PowerOff_Icon_RedLine.jpg]] | |style="text-align:center;|[[File:VController_PowerOff_Icon_RedLine.jpg]] | ||
|Monitor has failed to turn off / monitor's status is unknown. | |||
|} | |} | ||
===Source Menu=== | ===Source Menu=== | ||
| Line 67: | Line 67: | ||
<li>Enter the IP address of the monitor or projector in the IP address field.</li> | <li>Enter the IP address of the monitor or projector in the IP address field.</li> | ||
</ol> | </ol> | ||
:{| class="wikitable | :{| class="wikitable" width="50%" | ||
|- style="text-align:center; background-color:#c41230; color:#ffffff; font-weight:bold;" | |- style="text-align:center; background-color:#c41230; color:#ffffff; font-weight:bold;" | ||
! style="text-align:center; background-color:#c41230; color:#ffffff; font-weight:bold;" | Icon | ! style="text-align:center; background-color:#c41230; color:#ffffff; font-weight:bold;" | Icon | ||
| Line 73: | Line 73: | ||
|-style="text-align:center;" | |-style="text-align:center;" | ||
| [[File:vController_Add_Icon.jpg]] | | [[File:vController_Add_Icon.jpg]] | ||
| style=" | | style="text-align:left" | Add IP address into group. | ||
|-style="text-align:center;" | |-style="text-align:center;" | ||
| [[File:vController_Remove_Icon.jpg]] | | [[File:vController_Remove_Icon.jpg]] | ||
| Line 113: | Line 113: | ||
===Getting Button=== | ===Getting Button=== | ||
Press to the '''Getting Button''' [[File:vController_Source_Icon.jpg]] to read the RS232 or LAN commands. | Press to the '''Getting Button''' [[File:vController_Source_Icon.jpg]] to read the RS232 or LAN commands. | ||
:{| class="wikitable | :{| class="wikitable" width="50%" | ||
|- | |- | ||
! style="text-align:center; background-color:#c41230; color:#ffffff; font-weight:bold;" | Icon | ! style="text-align:center; background-color:#c41230; color:#ffffff; font-weight:bold;" | Icon | ||
! style="text-align:center; background-color:#c41230; color:#ffffff; font-weight:bold;" | Description | ! style="text-align:center; background-color:#c41230; color:#ffffff; font-weight:bold;" | Description | ||
|-style="text-align:center;" | |- | ||
| [[File:vController_Source_Icon_Green.jpg]] | |style="text-align:center;"|[[File:vController_Source_Icon_Green.jpg]] | ||
|Command was successfully read. | |||
|- style="text-align:center;" | |- | ||
| [[File:vController_Source_Icon_Red.jpg]] | |style="text-align:center;"|[[File:vController_Source_Icon_Red.jpg]] | ||
|Command was not set / command is not supported. | |||
|-style="text-align:center;" | |- | ||
| [[File:vControllervController_Source_Icon_Yellow.jpg]] | |style="text-align:center;"|[[File:vControllervController_Source_Icon_Yellow.jpg]] | ||
|Command is still processing. | |||
|} | |} | ||
==Setup== | ==Setup== | ||
:[[File:vController_Setup1.jpg|550px]] | |||
:{| class="wikitable" width="50%" | |||
|- | |||
! style="text-align:center; background-color:#c41230; color:#ffffff; font-weight:bold;" |Item | |||
! style="text-align:center; background-color:#c41230; color:#ffffff; font-weight:bold;" |Function Description | |||
! style="text-align:center; background-color:#c41230; color:#ffffff; font-weight:bold;" |Commands Supported | |||
! style="text-align:center; background-color:#c41230; color:#ffffff; font-weight:bold;" |Devices Supported | |||
|- | |||
| OSD Language | |||
| Select the language for the OSD interface. | |||
| Write | |||
| All devices | |||
|- | |||
| Power Lock | |||
| Button used to activate or de-activate the power source. | |||
| Write/Read | |||
| All devices | |||
|- | |||
| Button Lock | |||
| Button used to activate or de-activate the control panel buttons. | |||
| Write/Read | |||
| All devices | |||
|- | |||
| Menu Lock | |||
| Button used to activate or de-activate the main menu buttons. | |||
| Write/Read | |||
| All devices | |||
|- | |||
| DTV Channel | |||
| Select the digital TV channel. | |||
| Write | |||
| TV types | |||
|- | |||
| ATV Channel | |||
| Select the analog TV channel | |||
| Write | |||
| TV types | |||
|- | |||
| Remote Control | |||
| Choose whether to switch the remote control on/off or select the IR pass through mode. When the IR pass through mode has been activated, the name of the button would be displayed in the RC display frame when the remote control is pressed. | |||
| Write/Read | |||
| All devices | |||
|- | |||
| Set-Up Wizard | |||
| Choose whether to switch the set-up wizard on/off (only for TV devices) | |||
| Write/Read | |||
| TV types | |||
|- | |||
| Restore Default | |||
| Return all settings to the default factory settings | |||
| Write | |||
| All devices | |||
|- | |||
| Ack | |||
| Tests the communication connections | |||
| Write | |||
| All devices | |||
|} | |||
==Picture== | |||
:[[File:vController_Setup2.jpg|550px]] | |||
:{| class="wikitable" width="50%" | |||
|- | |||
! style="text-align:center; background-color:#c41230; color:#ffffff; font-weight:bold;" |Item | |||
! style="text-align:center; background-color:#c41230; color:#ffffff; font-weight:bold;" |Function Description | |||
! style="text-align:center; background-color:#c41230; color:#ffffff; font-weight:bold;" |Commands Supported | |||
! style="text-align:center; background-color:#c41230; color:#ffffff; font-weight:bold;" |Devices Supported | |||
|- | |||
| Contrast | |||
| Adjust contrast to improve display quality.The black portions of the image would be blacker, while the white portions would be whiter. | |||
| Write/Read | |||
| All devices | |||
|- | |||
| Brightness | |||
| Adjust brightness of the image displayed. | |||
| Write/Read | |||
| All devices | |||
|- | |||
| Sharpness | |||
| Adjust and improve the image sharpness. | |||
| Write/Read | |||
| All devices | |||
|- | |||
| Backlight | |||
| Adjust the panel backlights | |||
| Write/Read | |||
| All devices | |||
|- | |||
| Color | |||
| Increase or decrease the color strength of the image. | |||
| Write/Read | |||
| All devices | |||
|- | |||
| Tint | |||
| Increase or decrease the tint of the image. Increasing tint will make the image greener, while decreasing tint will make the image appear more purple. | |||
| Write/Read | |||
| All devices | |||
|- | |||
| Color Mode | |||
| Select the warmth of the color used for the image. Low-warmth images would appear slightly red, while high-warmth images would appear slightly blue. | |||
| Write | |||
| All devices | |||
|- | |||
| Picture Size | |||
| Select picture size. | |||
| Write | |||
| All devices | |||
|} | |||
==Audio== | |||
:[[File:vController_Setup3.jpg|550px]] | |||
:{| class="wikitable" width="50%" | |||
|- | |||
! style="text-align:center; background-color:#c41230; color:#ffffff; font-weight:bold;" |Item | |||
! style="text-align:center; background-color:#c41230; color:#ffffff; font-weight:bold;" |Function Description | |||
! style="text-align:center; background-color:#c41230; color:#ffffff; font-weight:bold;" |Commands Supported | |||
! style="text-align:center; background-color:#c41230; color:#ffffff; font-weight:bold;" |Devices Supported | |||
|- | |||
| Sound | |||
| Switch the SRS effects on or off. | |||
| Write | |||
| All devices | |||
|- | |||
| Bass | |||
| Increase or decrease the bass volume. | |||
| Write | |||
| All devices | |||
|- | |||
| Treble | |||
| Increase or decrease the treble volume. | |||
| Write | |||
| All devices | |||
|- | |||
| Balance | |||
| Adjust the balance of the left and right channels. | |||
| Write | |||
| All devices | |||
|- | |||
| Volume | |||
| Increase or decrease the monitor volume. | |||
| Write/Read | |||
| All devices | |||
|- | |||
| Mute | |||
| Mute or unmute the monitor speakers. | |||
| Write/Read | |||
| All devices | |||
|} | |||
==Tiling== | |||
This function allows users to establish a large array of monitors (TV walls). This function requires daisy chain connections. The maximum number of monitors to be arranged horizontally / vertically would depend on the specifications of the monitors used. | |||
:[[File:vController_Setup4.jpg|550px]] | |||
:{| class="wikitable" width="50%" | |||
|- | |||
! style="text-align:center; background-color:#c41230; color:#ffffff; font-weight:bold;" |Item | |||
! style="text-align:center; background-color:#c41230; color:#ffffff; font-weight:bold;" |Function Description | |||
! style="text-align:center; background-color:#c41230; color:#ffffff; font-weight:bold;" |Commands Supported | |||
! style="text-align:center; background-color:#c41230; color:#ffffff; font-weight:bold;" |Devices Supported | |||
|- | |||
| Tiling-Mode | |||
| Swith on / off Tiling-Mode. | |||
| Write/Read | |||
| TV wall type (CDX) | |||
|- | |||
| Tiling-Compensation | |||
| Turn on / off the tiling-compensation function. When switched on, the monitors would adjust the image to compensate for the width of the border frames and provide an accurate and precise display of the images. | |||
| Write/Read | |||
| TV wall type (CDX) | |||
|- | |||
| Tiling-H by V Monitors | |||
| Select the number of monitors in the horizontal / vertical directions. | |||
| Write/Read | |||
| TV wall type (CDX) | |||
|- | |||
| Tiling Position | |||
| Designate the position of the monitor in the monitor tiling matrix. | |||
| Write/Read | |||
| TV wall type (CDX) | |||
|} | |||
==KeyPad== | |||
:[[File:vController_Setup5.jpg|550px]] | |||
:{| class="wikitable" width="50%" | |||
|- | |||
! style="text-align:center; background-color:#c41230; color:#ffffff; font-weight:bold;" |Item | |||
! style="text-align:center; background-color:#c41230; color:#ffffff; font-weight:bold;" |Function Description | |||
! style="text-align:center; background-color:#c41230; color:#ffffff; font-weight:bold;" |Commands Supported | |||
! style="text-align:center; background-color:#c41230; color:#ffffff; font-weight:bold;" |Devices Supported | |||
|- | |||
| style="text-align:center;|[[File:VController_Power_Button.jpg|50px]] <br />Power On Button | |||
| Press this button to power on device. | |||
| Write | |||
| All devices | |||
|- | |||
| style="text-align:center;|[[File:VController_PowerOff_Button.jpg|50px]]<br />Power Off Button | |||
| Press this button to power off device. | |||
| Write | |||
| All devices | |||
|- | |||
| style="text-align:center;|[[File:VController_Menu_Button.jpg|50px]]<br />Menu Button | |||
| Press this button to access the OSD menu. | |||
| Write | |||
| All devices | |||
|- | |||
| style="text-align:center;|[[File:VController_Volume_Down_Button.jpg|50px]]<br />Volume Down Button | |||
| Press this button to decrease the audio output level. | |||
| Write | |||
| All devices | |||
|- | |||
| style="text-align:center;|[[File:VController_Volume_Up_Button.jpg|50px]]<br />Volume Up Button | |||
| Press this button to increase the audio output level. | |||
| Write | |||
| All devices | |||
|- | |||
| style="text-align:center;|[[File:VController_Mute_Button.jpg|50px]]<br />Mute Button | |||
| Press this button to turn the mute function on / off. | |||
| Write | |||
| All devices | |||
|- | |||
| style="text-align:center;|[[File:VController_Source_Switch.jpg|150px]]<br />Source Switch Buttons | |||
| Press these buttons to select the input source. | |||
| Write | |||
| All devices | |||
|- | |||
| style="text-align:center;|[[File:VController_Number_Buttons.jpg|150px]]<br />0 - 9 Buttons | |||
| Select the desired number by pressing the 0 - 9 buttons | |||
| Write | |||
| All devices | |||
|- | |||
| style="text-align:center;|[[File:VController_Arrow_Buttons.jpg|50px]]<br />Arrow Buttons and Enter Button | |||
| Use to '''Arrow Buttons''' to adjust the selected item in the OSD interface. Press the '''ENTER Button''' to confirm the action. | |||
| Write | |||
| All devices | |||
|} | |||
[[Category:VController]] | [[Category:VController]] | ||
Revision as of 07:26, 17 June 2022
Introduction
vController 2.0 integrates RS232 and LAN command for monitors and projectors.
- Start Up
- Setting
- Schedule
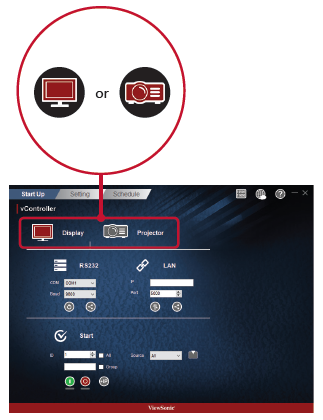
Start Up
Select Drive
- Press the Monitor Icon
 to control the monitor or the Projector Icon
  to control the projector.


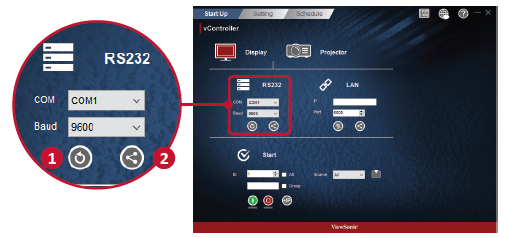
RS232 Settings
- Press the Return Button
 to search for the RS232 connection ports and then select a corresponding hardware connection port.
 - Default baud rate is 9600.
- Press the Share Button
 to connect to the RS232. When the RS232 has been successfully connected, the button will turn green.


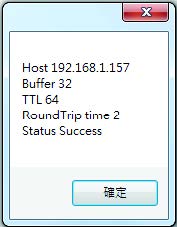
Network Settings
- Enter the IP address of the monitor in the IP address field.
- When the network settings interface is opened, press the Ping Button
 to check if the connection is successful.
 - Default port number is 5000.
- Press the Share Button to connect to the RS232. When the RS232 has been successfully connected, the button will turn green.


Start
Monitor ID
- Create ID numbers when connecting to monitors via RS232C. A unique ID should be created for each monitor. Check All when connecting to multiple monitors.
- NOTE: Only monitors support ID numbers. Projectors don't use ID numbers.
ID Group
- Check Group.
- Enter ID numbers in the text field.
On/Off Buttons
- Press the On Button
 to turn on the monitor.
 - Press the Off Button
 to turn off the monitor.


Icon Description
Monitor has turned on successfully. 
Monitor has failed to turn on / monitor's status is unknown.
Monitor has turned off successfully. 
Monitor has failed to turn off / monitor's status is unknown.


Source Menu
- Select video source with the pull-down menu
- Press the Source Button
 to switch the input signal.
IP Group
- Press the IP Button
 to set the IP group.
- Enter the IP address of the monitor or projector in the IP address field.

Icon Description 
Add IP address into group. 
Remove IP address from group. 
Move up the focus IP address. 
Move down the focus IP address. 
Enable all IP address. 
Disable all IP address. 
Close IP group windows.


Setting
Setting / Getting Buttons
Setting Button
Press to the Setting Button  to set the RS232 or LAN commands.
Icon Description 
Command was successfully read. 
Command was not set / command is not supported. 
Command is still processing.


Getting Button
Press to the Getting Button  to read the RS232 or LAN commands.
Icon Description 
Command was successfully read. 
Command was not set / command is not supported. 
Command is still processing.


Setup

Item Function Description Commands Supported Devices Supported OSD Language Select the language for the OSD interface. Write All devices Power Lock Button used to activate or de-activate the power source. Write/Read All devices Button Lock Button used to activate or de-activate the control panel buttons. Write/Read All devices Menu Lock Button used to activate or de-activate the main menu buttons. Write/Read All devices DTV Channel Select the digital TV channel. Write TV types ATV Channel Select the analog TV channel Write TV types Remote Control Choose whether to switch the remote control on/off or select the IR pass through mode. When the IR pass through mode has been activated, the name of the button would be displayed in the RC display frame when the remote control is pressed. Write/Read All devices Set-Up Wizard Choose whether to switch the set-up wizard on/off (only for TV devices) Write/Read TV types Restore Default Return all settings to the default factory settings Write All devices Ack Tests the communication connections Write All devices
Picture

Item Function Description Commands Supported Devices Supported Contrast Adjust contrast to improve display quality.The black portions of the image would be blacker, while the white portions would be whiter. Write/Read All devices Brightness Adjust brightness of the image displayed. Write/Read All devices Sharpness Adjust and improve the image sharpness. Write/Read All devices Backlight Adjust the panel backlights Write/Read All devices Color Increase or decrease the color strength of the image. Write/Read All devices Tint Increase or decrease the tint of the image. Increasing tint will make the image greener, while decreasing tint will make the image appear more purple. Write/Read All devices Color Mode Select the warmth of the color used for the image. Low-warmth images would appear slightly red, while high-warmth images would appear slightly blue. Write All devices Picture Size Select picture size. Write All devices
Audio

Item Function Description Commands Supported Devices Supported Sound Switch the SRS effects on or off. Write All devices Bass Increase or decrease the bass volume. Write All devices Treble Increase or decrease the treble volume. Write All devices Balance Adjust the balance of the left and right channels. Write All devices Volume Increase or decrease the monitor volume. Write/Read All devices Mute Mute or unmute the monitor speakers. Write/Read All devices
Tiling
This function allows users to establish a large array of monitors (TV walls). This function requires daisy chain connections. The maximum number of monitors to be arranged horizontally / vertically would depend on the specifications of the monitors used.

Item Function Description Commands Supported Devices Supported Tiling-Mode Swith on / off Tiling-Mode. Write/Read TV wall type (CDX) Tiling-Compensation Turn on / off the tiling-compensation function. When switched on, the monitors would adjust the image to compensate for the width of the border frames and provide an accurate and precise display of the images. Write/Read TV wall type (CDX) Tiling-H by V Monitors Select the number of monitors in the horizontal / vertical directions. Write/Read TV wall type (CDX) Tiling Position Designate the position of the monitor in the monitor tiling matrix. Write/Read TV wall type (CDX)
KeyPad

Item Function Description Commands Supported Devices Supported 
Power On ButtonPress this button to power on device. Write All devices 
Power Off ButtonPress this button to power off device. Write All devices 
Menu ButtonPress this button to access the OSD menu. Write All devices 
Volume Down ButtonPress this button to decrease the audio output level. Write All devices 
Volume Up ButtonPress this button to increase the audio output level. Write All devices 
Mute ButtonPress this button to turn the mute function on / off. Write All devices 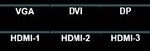
Source Switch ButtonsPress these buttons to select the input source. Write All devices 
0 - 9 ButtonsSelect the desired number by pressing the 0 - 9 buttons Write All devices 
Arrow Buttons and Enter ButtonUse to Arrow Buttons to adjust the selected item in the OSD interface. Press the ENTER Button to confirm the action. Write All devices


