LS901HD LS901-4K Remote Control: Difference between revisions
From ViewSonic Documentation
// via Wikitext Extension for VSCode |
// via Wikitext Extension for VSCode |
||
| (16 intermediate revisions by 2 users not shown) | |||
| Line 1: | Line 1: | ||
===Remote Control=== | ===<translate><!--T:1--> Remote Control</translate>=== | ||
[[File:LS901HD_Remote_Control.png|right|250px| Remote Control]] | <div class="res-img">[[File:LS901HD_Remote_Control.png|right|250px| <translate><!--T:2--> Remote Control</translate> | alt=<translate><!--T:3--> Remote Control</translate>]]</div> | ||
{| class="wikitable" style="text-align:center; width:60%; background-color:#ffffff;" | {| class="wikitable" style="text-align:center; width:60%; background-color:#ffffff;" | ||
! style="font-weight:bold; background-color:#db0025; color:#ffffff;" | | ! colspan="3" style="font-weight:bold; background-color:#db0025; color:#ffffff;" | <translate><!--T:4--> Button</translate> | ||
! | ! style="text-align: center; font-weight:bold; background-color:#db0025; color:#ffffff;" | <translate><!--T:5--> Description</translate> | ||
! style="text-align: center; font-weight:bold; background-color:#db0025; color:#ffffff;" | Description | |||
|- | |- | ||
| '''1''' | | '''1''' | ||
| AV Mute | | '''<translate><!--T:6--> AV Mute </translate>''' | ||
| Hides the screen picture and volume mute. | | [[File:LS901HD_AV_Mute_Icon.svg|40px| <translate><!--T:7--> AV Mute</translate> | alt= <translate><!--T:8--> AV Mute icon</translate> |link=]] | ||
| style="text-align: left;" | <translate><!--T:9--> Hides the screen picture and volume mute.</translate> | |||
|- | |- | ||
| '''2''' | | '''2''' | ||
| Power | | '''<translate><!--T:10--> Power </translate>''' | ||
| Turns the projector On or Off. | | [[File:LS901HD_Power_Icon.svg|40px| <translate><!--T:11--> Power Switch</translate> | alt= <translate><!--T:12--> Power switch icon</translate> |link=]] | ||
| style="text-align: left;" | <translate><!--T:13--> Turns the projector On or Off.</translate> | |||
|- | |- | ||
| '''3''' | | '''3''' | ||
| Auto Sync | | '''<translate><!--T:14--> Auto Sync </translate>''' | ||
| Automatically determines the best picture timings for the displayed image. | | [[File:LS901HD_Auto_Sync_Icon.svg|40px| <translate><!--T:15--> Auto Sync</translate> | alt= <translate><!--T:16--> Auto Sync icon</translate> |link=]] | ||
| style="text-align: left;" | <translate><!--T:17--> Automatically determines the best picture timings for the displayed image.</translate> | |||
|- | |- | ||
| '''4''' | | '''4''' | ||
| Source | | '''<translate><!--T:18--> Source </translate>''' | ||
| Displays the input source selection bar. | | [[File:LS901HD_Source_Icon.svg|40px| <translate><!--T:19--> Input Source</translate> | alt= <translate><!--T:20--> Input Source icon</translate> |link=]] | ||
| style="text-align: left;" | <translate><!--T:21--> Displays the input source selection bar.</translate> | |||
|- | |- | ||
| '''5''' | | '''5''' | ||
| Navigation Buttons | | '''<translate><!--T:22--> Navigation Buttons </translate>''' | ||
| Navigates and selects the desired menu items and make adjustments. | | [[File:LS901HD_Arrow_Key_Icon.svg|40px| <translate><!--T:23--> Arrow Keys</translate> | alt= <translate><!--T:24--> Arrow Key icon</translate> |link=]] | ||
| style="text-align: left;" | <translate><!--T:25--> Navigates and selects the desired menu items and make adjustments.</translate> | |||
|- | |- | ||
| '''6''' | | '''6''' | ||
| Enter | | '''<translate><!--T:26--> Enter </translate>''' | ||
| Confirms the selection. | | [[File:LS901HD_Enter_Icon.svg|40px| <translate><!--T:27--> Enter</translate> | alt= <translate><!--T:28--> Enter icon</translate> |link=]] | ||
| style="text-align: left;" | <translate><!--T:29--> Confirms the selection.</translate> | |||
|- | |- | ||
| '''7''' | | '''7''' | ||
| Menu/Exit | | '''<translate><!--T:30--> Menu/Exit </translate>''' | ||
| *Turns the On-Screen Display (OSD) Menu On or Off. | | [[File:LS901HD_Menu_Icon.svg|40px| <translate><!--T:31--> Menu/Exit</translate> | alt= <translate><!--T:32--> Menu/Exit icon</translate> |link=]] | ||
| style="text-align: left;" | <translate> | |||
<!--T:33--> | |||
*Turns the On-Screen Display (OSD) Menu On or Off. | |||
*Go back to a previous OSD Menu. | *Go back to a previous OSD Menu. | ||
*Exit and Save menu settings. | *Exit and Save menu settings.</translate> | ||
|- | |- | ||
| '''8''' | | '''8''' | ||
| Brightness | | '''<translate><!--T:34--> Brightness </translate>''' | ||
| Displays the brightness mode selection bar. | | [[File:LS901HD_Brightness_Icon.svg|40px| <translate><!--T:35--> Brightness</translate> | alt= <translate><!--T:36--> Brightness icon</translate> |link=]] | ||
| style="text-align: left;" | <translate><!--T:37--> Displays the brightness mode selection bar.</translate> | |||
|- | |- | ||
| '''9''' | | '''9''' | ||
| Volume Up | | '''<translate><!--T:38--> Volume Up </translate>''' | ||
| Increase the volume level. | | [[File:LS901HD_Vol_Up_Icon.svg|40px| <translate><!--T:39--> Volume Up</translate> | alt= <translate><!--T:40--> Volum Up icon</translate> |link=]] | ||
| style="text-align: left;" | <translate><!--T:41--> Increase the volume level.</translate> | |||
|- | |- | ||
| '''10''' | | '''10''' | ||
| Keystone | | '''<translate><!--T:42--> Keystone </translate>''' | ||
| Manually correct distorted images. | | [[File:LS901HD_Keystone_Icon.svg|40px| <translate><!--T:43--> Keystone</translate> | alt= <translate><!--T:44--> Keystone icons</translate> |link=]] | ||
| style="text-align: left;" | <translate><!--T:45--> Manually correct distorted images.</translate> | |||
|- | |- | ||
| '''11''' | | '''11''' | ||
| Volume Down | | '''<translate><!--T:46--> Volume Down </translate>''' | ||
| Decrease the volume level. | | [[File:LS901HD_Vol_Down_Icon.svg|40px| <translate><!--T:47--> Volum Down</translate> | alt= <translate><!--T:48--> Volum Down icon</translate> |link=]] | ||
| style="text-align: left;" | <translate><!--T:49--> Decrease the volume level.</translate> | |||
|- | |- | ||
| '''12''' | | '''12''' | ||
| Video | | '''<translate><!--T:50--> Video </translate>''' | ||
| ''Unsupported Button'' | | [[File:LS901HD_Video_Icon.svg|40px| <translate><!--T:51--> Video</translate> | alt= <translate><!--T:52--> Video icon</translate> |link=]] | ||
| style="text-align: left;" | ''<translate><!--T:53--> Unsupported Button</translate>'' | |||
|- | |- | ||
| '''13''' | | '''13''' | ||
| VGA | | '''<translate><!--T:54--> VGA </translate>''' | ||
| ''Unsupported Button'' | | [[File:LS901HD_VGA_Icon.svg|40px| <translate><!--T:55--> VGA</translate> | alt= <translate><!--T:56--> VGA icon</translate> |link=]] | ||
| style="text-align: left;" | ''<translate><!--T:57--> Unsupported Button</translate>'' | |||
|- | |- | ||
| '''14''' | | '''14''' | ||
| HDMI | | '''<translate><!--T:58--> HDMI </translate>''' | ||
| Selects the '''HDMI 1''' or '''HDMI 2''' input source. | | [[File:LS901HD_HDMI_Icon.svg|40px| <translate><!--T:59--> HDMI</translate> | alt= <translate><!--T:60--> HDMI icon</translate> |link=]] | ||
| style="text-align: left;" | <translate><!--T:61--> Selects the '''HDMI 1''' or '''HDMI 2''' input source.</translate> | |||
|- | |- | ||
| '''15''' | | '''15''' | ||
| Aspect | | '''<translate><!--T:62--> Aspect </translate>''' | ||
| Displays the aspect ratio selection bar. | | [[File:LS901HD_Aspect_Icon.svg|40px| <translate><!--T:63--> Aspect</translate> | alt= <translate><!--T:64--> Aspect icon</translate> |link=]] | ||
| style="text-align: left;" | <translate><!--T:65--> Displays the aspect ratio selection bar.</translate> | |||
|- | |- | ||
| '''16''' | | '''16''' | ||
| Page Up | | '''<translate><!--T:66--> Page Up </translate>''' | ||
| ''Unsupported Button'' | | [[File:LS901HD_PgUp_Icon.svg|40px| <translate><!--T:67--> Page Up</translate> | alt= <translate><!--T:68--> Page Up icon</translate> |link=]] | ||
| style="text-align: left;" | ''<translate><!--T:69--> Unsupported Button</translate>'' | |||
|- | |- | ||
| '''17''' | | '''17''' | ||
| Zoom In | | '''<translate><!--T:70--> Zoom In </translate>''' | ||
| Increases the projected image size. | | [[File:LS901HD_ZoomIn_Icon.svg|40px| <translate><!--T:71--> Zoom In</translate> | alt= <translate><!--T:72--> Zoom In icon</translate> |link=]] | ||
| style="text-align: left;" | <translate><!--T:73--> Increases the projected image size.</translate> | |||
|- | |- | ||
| '''18''' | | '''18''' | ||
| Freeze | | '''<translate><!--T:74--> Freeze </translate>''' | ||
| Freeze the projected image. | | [[File:LS901HD_Freeze_Icon.svg|40px| <translate><!--T:75--> Freeze</translate> | alt= <translate><!--T:76--> Freeze icon</translate> |link=]] | ||
| style="text-align: left;" | <translate><!--T:77--> Freeze the projected image.</translate> | |||
|- | |- | ||
| '''19''' | | '''19''' | ||
| Zoom Out | | '''<translate><!--T:78--> Zoom Out </translate>''' | ||
| Reduces the projected image size. | | [[File:LS901HD_ZoomOut_Icon.svg|40px| <translate><!--T:79--> Zoom Out</translate> | alt= <translate><!--T:80--> Zoom Out icon</translate> |link=]] | ||
| style="text-align: left;" | <translate><!--T:81--> Reduces the projected image size.</translate> | |||
|- | |- | ||
| '''20''' | | '''20''' | ||
| Page Down | | '''<translate><!--T:82--> Page Down </translate>''' | ||
| ''Unsupported Button'' | | [[File:LS901HD_PgDn_Icon.svg|40px| <translate><!--T:83--> Page Down</translate> | alt= <translate><!--T:84--> Page Down icon</translate> |link=]] | ||
| style="text-align: left;" | ''<translate><!--T:85--> Unsupported Button</translate>'' | |||
|- | |- | ||
| '''21''' | | '''21''' | ||
| Display Mode | | '''<translate><!--T:86--> Display Mode </translate>''' | ||
| Displays the color mode selection bar. | | [[File:LS901HD_DisplayMode_Icon.svg|40px| <translate><!--T:87--> Display Mode</translate> | alt= <translate><!--T:88--> Display Mode icon</translate> |link=]] | ||
| style="text-align: left;" | <translate><!--T:89--> Displays the color mode selection bar.</translate> | |||
|- | |- | ||
| '''22''' | | '''22''' | ||
| Mouse Mode | | '''<translate><!--T:90--> Mouse Mode </translate>''' | ||
| ''Unsupported Button'' | | [[File:LS901HD_MouseMode_Icon.svg|40px| <translate><!--T:91--> Mouse Mod</translate>e| alt= <translate><!--T:92--> Mouse Mode icon</translate> |link=]] | ||
| style="text-align: left;" | ''<translate><!--T:93--> Unsupported Button</translate>'' | |||
|- | |- | ||
| '''23''' | | '''23''' | ||
| Mute | | '''<translate><!--T:94--> Mute </translate>''' | ||
| Mute/ | | [[File:LS901HD_Mute_Icon.svg|40px| <translate><!--T:95--> Mute</translate> | alt= <translate><!--T:96--> Mute icon</translate> |link=]] | ||
|- | | style="text-align: left;" | <translate><!--T:97--> Mute/Unmute.</translate> | ||
|} | |} | ||
====Remote Control - Receiver Range==== | ====<translate><!--T:98--> Remote Control - Receiver Range</translate>==== | ||
[[File: | <div class="res-img">[[File:LS901HD_Remote_Control_Effective_Range.png|right|250px| <translate><!--T:99--> IR Receiver Location</translate> | alt=<translate><!--T:100--> The effective IR range</translate>]]</div> | ||
To ensure proper function of the remote control follow the steps below: | To ensure proper function of the remote control follow the steps below: | ||
# The remote control must be held at an angle within 30° perpendicular to the projector’s IR remote control sensor(s). | # <translate>The remote control must be held at an angle within 30° perpendicular to the projector’s IR remote control sensor(s).</translate> | ||
# The distance between the remote control and the sensor(s) should not exceed | # <translate>The distance between the remote control and the sensor(s) should not exceed 8 m (26 ft).</translate> | ||
{{Note| <translate><!--T:102--> Refer to the illustration for the location of the infrared (IR) remote control sensor(s).</translate>}} | |||
{{Note| Refer to the illustration for the location of the infrared (IR) remote control sensor(s).}} | |||
====Replacing the Batteries==== | ====<translate><!--T:103--> Replacing the Batteries</translate>==== | ||
# Remove the battery cover from the bottom of the remote control by pressing the finger grip and sliding it across. | # <translate>Remove the battery cover from the bottom of the remote control by pressing the finger grip and sliding it across.</translate> | ||
# Remove any existing batteries (if necessary) and install two AAA batteries. | # <translate>Remove any existing batteries (if necessary) and install two AAA batteries.</translate> | ||
{{Note| Observe the battery’s polarities as indicated.}} | {{Note| <translate><!--T:105--> Observe the battery’s polarities as indicated.</translate>}} | ||
<ol start="3"><li>Replace the battery cover by aligning it with the base and pushing it back into position. | <ol start="3"><li><translate><!--T:106--> Replace the battery cover by aligning it with the base and pushing it back into position.</translate> | ||
<div class="res-img">[[File:LS710HD_LS751HD_Replacing_Batteries.JPG|400px]]</div></li></ol> | <div class="res-img">[[File:LS710HD_LS751HD_Replacing_Batteries.JPG|400px| <translate><!--T:107--> battery replacement</translate> | alt=<translate><!--T:108--> The process of battery replacement</translate>]]</div></li></ol> | ||
{{Note| | {{Note| | ||
:* Avoid leaving the remote control and batteries in excessive heat or a humid environment. | :* <translate>Avoid leaving the remote control and batteries in excessive heat or a humid environment.</translate> | ||
:* Replace only with the same or equivalent type recommended by the battery manufacturer. | :* <translate>Replace only with the same or equivalent type recommended by the battery manufacturer.</translate> | ||
:* If the battery is drained or if you will not be using the remote control for an extended period of time, remove the battery to avoid damage to the remote control. | :* <translate>If the battery is drained or if you will not be using the remote control for an extended period of time, remove the battery to avoid damage to the remote control.</translate> | ||
:* Dispose of used batteries according to the manufacturer’s instructions and local environment regulations for your region. | :* <translate>Dispose of used batteries according to the manufacturer’s instructions and local environment regulations for your region.</translate> | ||
}} | }} | ||
Latest revision as of 05:50, 8 November 2024
Remote Control

| Button | Description | ||
|---|---|---|---|
| 1 | AV Mute | Hides the screen picture and volume mute. | |
| 2 | Power | Turns the projector On or Off. | |
| 3 | Auto Sync | Automatically determines the best picture timings for the displayed image. | |
| 4 | Source | Displays the input source selection bar. | |
| 5 | Navigation Buttons | Navigates and selects the desired menu items and make adjustments. | |
| 6 | Enter | Confirms the selection. | |
| 7 | Menu/Exit | *Turns the On-Screen Display (OSD) Menu On or Off.
| |
| 8 | Brightness | Displays the brightness mode selection bar. | |
| 9 | Volume Up | Increase the volume level. | |
| 10 | Keystone | Manually correct distorted images. | |
| 11 | Volume Down | Decrease the volume level. | |
| 12 | Video | Unsupported Button | |
| 13 | VGA | Unsupported Button | |
| 14 | HDMI | Selects the HDMI 1 or HDMI 2 input source. | |
| 15 | Aspect | Displays the aspect ratio selection bar. | |
| 16 | Page Up | Unsupported Button | |
| 17 | Zoom In | Increases the projected image size. | |
| 18 | Freeze | Freeze the projected image. | |
| 19 | Zoom Out | Reduces the projected image size. | |
| 20 | Page Down | Unsupported Button | |
| 21 | Display Mode | Displays the color mode selection bar. | |
| 22 | Mouse Mode | Unsupported Button | |
| 23 | Mute | Mute/Unmute. | |
Remote Control - Receiver Range

To ensure proper function of the remote control follow the steps below:
- The remote control must be held at an angle within 30° perpendicular to the projector’s IR remote control sensor(s).
- The distance between the remote control and the sensor(s) should not exceed 8 m (26 ft).
Note: Refer to the illustration for the location of the infrared (IR) remote control sensor(s).
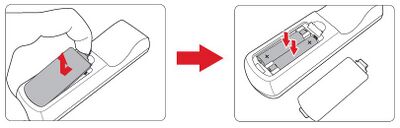
Replacing the Batteries
- Remove the battery cover from the bottom of the remote control by pressing the finger grip and sliding it across.
- Remove any existing batteries (if necessary) and install two AAA batteries.
Note: Observe the battery’s polarities as indicated.
- Replace the battery cover by aligning it with the base and pushing it back into position.

Note:
- Avoid leaving the remote control and batteries in excessive heat or a humid environment.
- Replace only with the same or equivalent type recommended by the battery manufacturer.
- If the battery is drained or if you will not be using the remote control for an extended period of time, remove the battery to avoid damage to the remote control.
- Dispose of used batteries according to the manufacturer’s instructions and local environment regulations for your region.