
IFP55G1 Connecting Devices: Difference between revisions
// via Wikitext Extension for VSCode |
Tag: visualeditor |
||
| (35 intermediate revisions by the same user not shown) | |||
| Line 8: | Line 8: | ||
<div class="grid-item">[[IFP55G1_Using_Gestures|Using Gestures]]</div> | <div class="grid-item">[[IFP55G1_Using_Gestures|Using Gestures]]</div> | ||
<div class="grid-item">[[IFP55G1_Connecting_Devices|Connecting Devices]]</div> | <div class="grid-item">[[IFP55G1_Connecting_Devices|Connecting Devices]]</div> | ||
<div class="grid-item">[[ | <div class="grid-item">[[IFP55G1_Using_the_ViewBoard|Using the ViewBoard]] </div> | ||
<div class="grid-item">[[IFP55G1_On-Screen Display_Menu_Tree|On-Screen Display Menu Tree]] </div> | |||
<div class="grid-item">[[IFP55G1_On-Screen_Display_Operation|On-Screen Display Menu Operation]] </div> | |||
<div class="grid-item">[[IFP55G1_RS-232_Protocols|RS-232 Protocols]]</div> | <div class="grid-item">[[IFP55G1_RS-232_Protocols|RS-232 Protocols]]</div> | ||
<div class="grid-item">[[IFP55G1_Specifications|Specifications]]</div> | <div class="grid-item">[[IFP55G1_Specifications|Specifications]]</div> | ||
| Line 21: | Line 23: | ||
=Connecting to Power= | =Connecting to Power= | ||
<div> | |||
<ol> | <ol> | ||
<li>Connect the power cord to the AC IN jack at the rear of the device</li> | <li>Connect the power cord to the AC IN jack at the rear of the device.</li> | ||
<li>Plug the power | <li>Plug the power cord plug into a power outlet. | ||
<p>[[File:IFP55G1 Connect Power.png|450px|Connect Power]]</p> | |||
</li> | |||
</ol> | </ol> | ||
</div> | |||
=Connecting External Devices and Touch Connection= | =Connecting External Devices and Touch Connection= | ||
<div class="res-img">[[File: | Your external device(s) can be connected in any of the following configurations: | ||
<div class="res-img">[[File:IFP55G1_External_and_Touch_Connection.png|Connecting External Devices|550px]]</div> | |||
== | ===C Type Connection=== | ||
To connect via | <p>To connect via C Type:<br> | ||
:Connect a | ::Connect a C Type cable from your external device to the '''C Type''' port on the ViewBoard. | ||
</p> | |||
==HDMI Connection== | ===HDMI Connection=== | ||
To connect via HDMI: | <p>To connect via HDMI:</p> | ||
<ol> | |||
<li>Connect an HDMI cable from your external device to the '''HDMI 1/2/3''' port on the ViewBoard. | |||
: | </li> | ||
<li>Connect a USB cable to the external device from the appropriate '''TOUCH''' port of the ViewBoard. | |||
{{Note| | |||
:*The '''TOUCH 1''' port is for the '''HDMI 1''' and '''VGA'''' ports. | |||
:*The '''TOUCH 2''' port is for the '''HDMI 2''' and '''HDMI 3''' ports. | |||
}} | |||
</li> | |||
</ol> | |||
==VGA Connection== | ===VGA Connection=== | ||
To connect via VGA: | <p>To connect via VGA:</p> | ||
<ol> | |||
<li>Connect a VGA cable from your external device to the '''VGA''' port on the ViewBoard. | |||
: | </li> | ||
<li>Connect a USB cable to the external device from the '''TOUCH 2''' port of the ViewBoard.<br> | |||
{{Note| | |||
:*The '''TOUCH 1''' port is for the '''HDMI 1''' and '''VGA''' ports. | |||
:*The '''TOUCH 2''' port is for he '''HDMI 2''' and '''HDMI 3''' ports. | |||
}} | |||
</li> | |||
</ol> | |||
=RS-232 Connection= | ===RS-232 Connection=== | ||
When you use a RS-232 serial port cable to connect your display to an external computer certain functions can be controlled remotely by the PC, including Power ON/OFF, Volume adjustment, Input select, Brightness, and more. | When you use a RS-232 serial port cable to connect your display to an external computer certain functions can be controlled remotely by the PC, including Power ON/OFF, Volume adjustment, Input select, Brightness, and more. | ||
<div class="res-img">[[File:IFP52-2_RS-232_Connection.png|RS-232 Connection|600px]]</div> | |||
=USB and Networking Connections= | =USB and Networking Connections= | ||
Just like any PC, it is easy to connect various USB devices and other peripherals to your ViewBoard. | Just like any PC, it is easy to connect various USB devices and other peripherals to your ViewBoard. | ||
==USB Peripherals== | ===USB Peripherals=== | ||
Plug the USB device cable into a '''USB''' port. | |||
<div class="res-img">[[File:IFP62_USB_Connection.png|USB Connection|600px]]</div> | <div class="res-img">[[File:IFP62_USB_Connection.png|USB Connection|600px]]</div> | ||
==Networking and Modem cables== | ===Networking and Modem cables=== | ||
Plug the network cable into a '''LAN''' port. | Plug the network cable into a '''LAN''' port. | ||
<div class="res-img">[[File:IFP52-2_LAN_Connection.png|Network Connection|600px]]</div> | |||
=Media Player Connection= | =Media Player Connection= | ||
< | <div> | ||
To connect a media player: | To connect a media player: | ||
<ol> | |||
<li>Connect the HDMI cable to a '''HDMI''' port on your ViewBoard and peripheral device. | |||
</li> | |||
<li>Plug in the power cord of your ViewBoard, and turn on the power supply switch. | |||
</li> | |||
<li>Press the <i class='fas fa-power-off'></i> '''Power''' button on the ViewBoard to turn the screen on. | |||
</li> | |||
<li> | |||
<p>Press the '''INPUT''' button on the remote control and switch to the “HDMI” input source.<br> | |||
[[File:IFP62_Media_Player_Connection.png|Media Player Connection|500px]] | |||
</p> | |||
</li> | |||
</ol> | |||
</div> | |||
=Audio Connection= | =Audio Connection= | ||
The ViewBoard supports '''Audio In''', '''Audio Out''', and '''SPDIF'''. | The ViewBoard supports [[IFP55G1_Connecting_Devices#Audio In|'''Audio In''']], [[IFP55G1_Connecting_Devices#Audio Out|'''Audio Out''']], and [[IFP55G1_Connecting_Devices#SPDIF Connection|'''SPDIF''']]. | ||
==Audio In== | ===Audio In=== | ||
To play audio from your external device through the ViewBoard’s speakers, connect one end of an audio cable to your external device, and the other end to the ViewBoard’s '''AUDIO IN''' port. | To play audio from your external device through the ViewBoard’s speakers, connect one end of an audio cable to your external device, and the other end to the ViewBoard’s '''AUDIO IN''' port. | ||
<div class="res-img">[[File: | <div class="res-img">[[File:IFP52-2_Audio_In_Connection.png|Audio In Connection|600px]]</div> | ||
==Audio Out== | ===Audio Out=== | ||
To play audio from the ViewBoard through an external speaker, connect one end of an audio cable to the external speaker, and the other end to the ViewBoard’s '''AUDIO OUT''' port. | To play audio from the ViewBoard through an external speaker, connect one end of an audio cable to the external speaker, and the other end to the ViewBoard’s '''AUDIO OUT''' port. | ||
<div class="res-img">[[File: | <div class="res-img">[[File:IFP52-2_Audio_Out_Connection.png|Audio Out Connection|600px]]</div> | ||
==SPDIF Connection== | ===SPDIF Connection=== | ||
To connect to an external sound system: | To connect to an external sound system: | ||
<ol> | |||
<li>Connect an optical cable from the '''SPDIF''' port to your sound system’s optical connector. | |||
</li> | |||
<li>Plug in the power cord of your ViewBoard, and turn on the power supply switch. | |||
</li> | |||
<li>Press the '''Power''' button on the ViewBoard to turn the screen on.<br> | |||
<p>[[File:IFP52-2_SPDIF_Connection.png|SPDIF Connection|600px]] | |||
</p> | |||
</li> | |||
</ol> | |||
=Optional Connections= | |||
The ViewBoard comes with an '''OPS Slot''' for optional add-ons such as a slot-in PC (e.g., VPC-25-O). | |||
<ol> | |||
<li>Remove the '''OPS Slot''' cover of the display. | |||
<p>[[File:IFPG1_OPS_Install_1.png|Installing a slot-in PC|500px]] | |||
</p> | |||
</li> | |||
<li>Carefully insert the slot-in PC into the '''OPS Slot''' of the display.<br> | |||
<p>[[File:IFPG1_OPS_Install_2.png|Installing a slot-in PC|550px]]</p> | |||
</li> | |||
<li>Secure the slot-in PC to the display. | |||
</li> | |||
</ol> | |||
{{#seo: | {{#seo: | ||
Latest revision as of 06:15, 27 June 2024
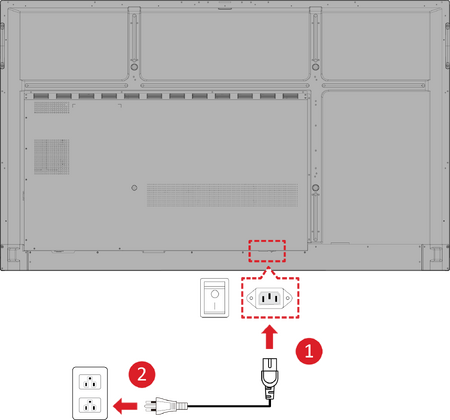
Connecting to Power
- Connect the power cord to the AC IN jack at the rear of the device.
- Plug the power cord plug into a power outlet.

Connecting External Devices and Touch Connection
Your external device(s) can be connected in any of the following configurations:

C Type Connection
To connect via C Type:
- Connect a C Type cable from your external device to the C Type port on the ViewBoard.
HDMI Connection
To connect via HDMI:
- Connect an HDMI cable from your external device to the HDMI 1/2/3 port on the ViewBoard.
- Connect a USB cable to the external device from the appropriate TOUCH port of the ViewBoard.
Note:
- The TOUCH 1 port is for the HDMI 1 and VGA' ports.
- The TOUCH 2 port is for the HDMI 2 and HDMI 3 ports.
VGA Connection
To connect via VGA:
- Connect a VGA cable from your external device to the VGA port on the ViewBoard.
- Connect a USB cable to the external device from the TOUCH 2 port of the ViewBoard.
Note:- The TOUCH 1 port is for the HDMI 1 and VGA ports.
- The TOUCH 2 port is for he HDMI 2 and HDMI 3 ports.
RS-232 Connection
When you use a RS-232 serial port cable to connect your display to an external computer certain functions can be controlled remotely by the PC, including Power ON/OFF, Volume adjustment, Input select, Brightness, and more.

USB and Networking Connections
Just like any PC, it is easy to connect various USB devices and other peripherals to your ViewBoard.
USB Peripherals
Plug the USB device cable into a USB port.

Networking and Modem cables
Plug the network cable into a LAN port.

Media Player Connection
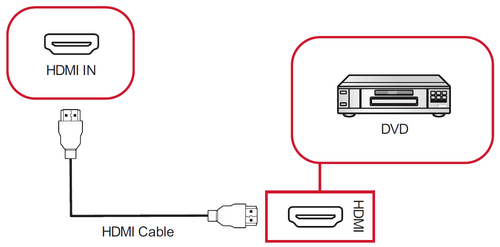
To connect a media player:
- Connect the HDMI cable to a HDMI port on your ViewBoard and peripheral device.
- Plug in the power cord of your ViewBoard, and turn on the power supply switch.
- Press the Power button on the ViewBoard to turn the screen on.
-
Press the INPUT button on the remote control and switch to the “HDMI” input source.

Audio Connection
The ViewBoard supports Audio In, Audio Out, and SPDIF.
Audio In
To play audio from your external device through the ViewBoard’s speakers, connect one end of an audio cable to your external device, and the other end to the ViewBoard’s AUDIO IN port.

Audio Out
To play audio from the ViewBoard through an external speaker, connect one end of an audio cable to the external speaker, and the other end to the ViewBoard’s AUDIO OUT port.

SPDIF Connection
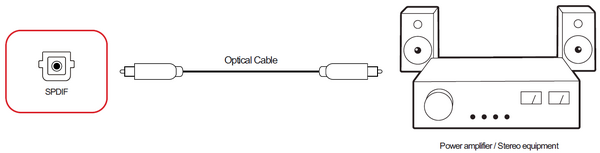
To connect to an external sound system:
- Connect an optical cable from the SPDIF port to your sound system’s optical connector.
- Plug in the power cord of your ViewBoard, and turn on the power supply switch.
- Press the Power button on the ViewBoard to turn the screen on.

Optional Connections
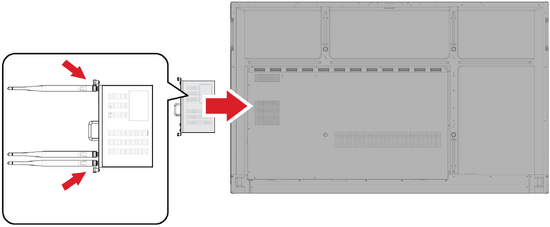
The ViewBoard comes with an OPS Slot for optional add-ons such as a slot-in PC (e.g., VPC-25-O).
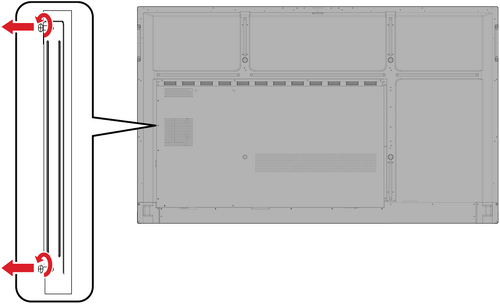
- Remove the OPS Slot cover of the display.
- Carefully insert the slot-in PC into the OPS Slot of the display.
- Secure the slot-in PC to the display.

