ViewBoard Cast Button
Device Requirements
- Windows 10/11, Intel i5 series CPU or above
- MacOS 10.10 or above
- ViewSonic IFP/CDE series device with vCastReceiver installed and activated, or an OPS slot-in set to PC as the input source with ViewBoard Cast Pro installed and activated
- VB-WPS-001: Device(s) supports fully-featured USB Type-C function cover USB & DP port
- VB-WPS-003: Device(s) support HDMI & USB Type-A
Windows PC and MacBook Pairing


- Plug-in the ViewBoard® Cast Button into your Windows PC or MacBook to pair.
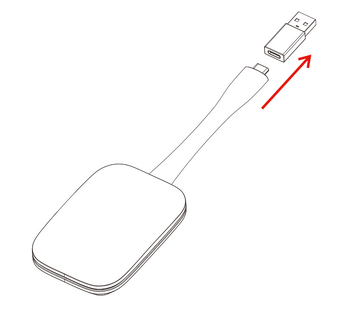
- For VB-WPS-001: Please plug-in to the USB Type C port (Figure 1).
- For VB-WPS-003: Please plug-in to both the HDMI out and USB Type A ports (Figure 2).
- If it is the first time to pair the ViewBoard® Cast Button with your Windows PC, please double click “ViewBoard Cast.exe” in: PC > CD Drive > ViewBoard Cast.
Note: If running on a MacBook, please enter the user password to access the application installation permission.
- For PC, with the application installed, ViewBoard® Cast will launch automatically after the ViewBoard® Cast Button is plugged into the PC.
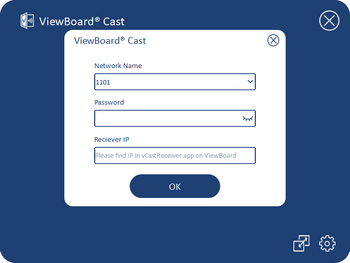
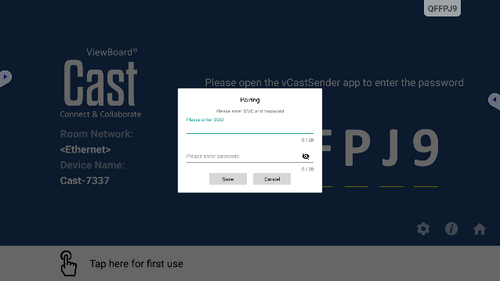
- The pairing dialogue box will pop up on your PC. Please enter the Network Name, Password, and the vCastReceiver IP address shown on the IFP/CDE device home screen.
- Click OK to complete the pairing of the ViewBoard® Cast Button and the IFP/CDE device.
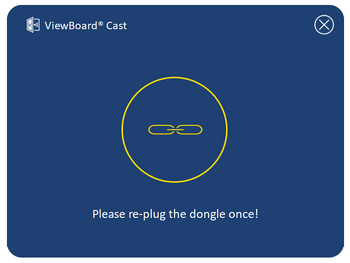
- Remove the ViewBoard® Cast Button and then plug it in again to start sharing
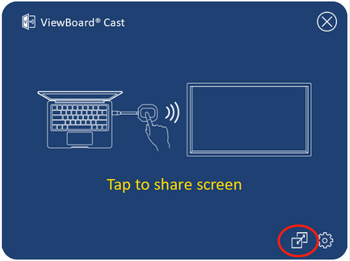
- If the ViewBoard® Cast Button has been paired, and you would like to pair it with another IFP/CDE device, please click the “Pairing-Switch Button” at the bottom right corner.
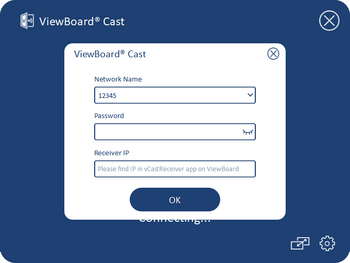
- Re-enter the network information to re-pair the ViewBoard® Cast Button.
- After the ViewBoard® Cast Button is re-paired, please remove it and plug it in again to start sharing.


ViewBoard IFP/CDE Pairing
You can also plug-in the ViewBoard Cast Button into IFP/CDE device to pair if the IFP/CDE device is connected to a LAN (Ethernet cable).
For VB-WPS-001:
- Attach the USB Type C to USB Type A adapter to the VB-WPS-001 ViewBoard® Cast Button
- Then plug the ViewBoard® Cast Button into the IFP/CDE device’s USB port for pairing.
Note: If running on a MacBook, please enter the user password to access the application installation permission.

For VB-WPS-003:
- Plug the USB Type A cable into the IFP/CDE device’s USB port for pairing.
- A “Pairing” dialogue box will appear.
- Enter the Network Name and Password, then select Save to pair.

Screen Sharing
- When the ViewBoard® Cast Button is connecting to your device, the LED indicator will be flashing blue. Your device is ready for screen sharing when the LED indicator changes to a static blue.

- Tap the button of the ViewBoard® Cast Button to share your device’s screen to another display. The LED indicator will change from blue to white when it’s successfully connected and sharing.

- If the LED indicator only flashes white and fails to connect, please ensure the IFP/CDE device are working correctly and that the pairing information is entered correctly.


Introduction to BYOM
ViewBoard Cast Button’s advanced feature of BYOM (Bring your Your Own Meeting) lets you use your own laptop to host a video conference with your preferred conferencing software (e.g., Microsoft Teams, Zoom, and Google Meet). You can extend your meeting to a ViewSonic IFP/CDE series device, optimizing workplace productivity.

How to Use the BYOM Feature
- Plug the ViewBoard Cast Button into your laptop.
- Start the ViewBoard Cast application (vCastReceiver) or the ViewBoard Cast Pro (vCastPro) and wait for the ViewBoard Cast Button to connect with the camera.
Note: Connection to the camera is established when the camera icon on the ViewBoard Cast changes from gray to white.
- Start a meeting on Microsoft Teams, Zoom, or Google Meet from your laptop.
- Tap the ViewBoard Cast Button to share content onto the ViewBoard IFP/CDE device.
- Select “ViewBoard Cast” as your Microphone/Speaker source and “ViewBoard Webcam” as your Camera source from the conferencing software.
Note: Refer to the table below for information on the different conferencing softwares.
 |
 |
|---|
| Conferencing Software | Audio and Video Settings | |
|---|---|---|
| Microsoft Teams | Audio |
|
| Video |
| |
| Google Meet | Audio |
|
| Video |
| |
| Zoom | Audio |
|
| Video |
| |
Network Information
- Wi-Fi: 802.11ac 5GHz channel for table on non-DFS channels in your country.
- Bandwidth: At least 10Mbps in a typical deployment. Latency shall be less than 50ms for HD video streaming, more than 10Mbps is required.
- Ports:
- TCP 56789, 25123, 8212, 8000, 8600
- UPD 48689, 25123
- Port and DNS for activation:
- Port: 443
- DNS: https://vcastactivate.viewsonic.com
- OTA service:
- Server Port: TCP 443
- Server FQDN Name: https://vcastupdate.viewsonic.com
Troubleshooting the ViewBoard Cast Button
This section describes some common problems that you may experience when using the ViewBoard Cast Button.
| Problem or Issue | Possible Solutions |
|---|---|
| ViewBoard Cast Button is not pairing with IFP/CDE device |
|
| LED indicator is only flashing white |
|
| IFP/CDE device cannot be found in the conferencing software |
|
| Audio and/or video is not outputting from the IFP/CDE device |
|
| Audio and/or video stops working during the conference |
|
| Bad audio and/or video quality through the IFP/CDE device |
|
| Remote participant hears an echo when speaking |
|
| Volume is too low |
|
Compliance Information
This section addresses all connected requirements and statements regarding regulations. Confirmed corresponding applications shall refer to nameplate labels and relevant markings on the unit.
FCC Compliance Statement
This device complies with part 15 of FCC Rules. Operation is subject to the following two conditions: (1) this device may not cause harmful interference, and (2) this device must accept any interference received, including interference that may cause undesired operation. This equipment has been tested and found to comply with the limits for a Class B digital device, pursuant to part 15 of the FCC Rules.
These limits are designed to provide reasonable protection against harmful interference in a residential installation. This equipment generates, uses, and can radiate radio frequency energy, and if not installed and used in accordance with the instructions, may cause harmful interference to radio communications. However, there is no guarantee that interference will not occur in a particular installation. If this equipment does cause harmful interference to radio or television reception, which can be determined by turning the equipment off and on, the user is encouraged to try to correct the interference by one or more of the following measures:
- Reorient or relocate the receiving antenna.
- Increase the separation between the equipment and receiver.
- Connect the equipment into an outlet on a circuit different from that to which the receiver is connected.
- Consult the dealer or an experienced radio/TV technician for help.
Warning: You are cautioned that changes or modifications not expressly approved by the party responsible for compliance could void your authority to operate the equipment.
Canadian Regulatory Statements
This device complies with Industry Canada license-exempt RSS standard(s). Operation is subject to the following two conditions: (1) this device may not cause interference, and (2) this device must accept any interference, including interference that may cause undesired operation of the device.
The following information is only for EU-member states
The mark shown to the right is in compliance with the Waste Electrical and Electronic Equipment Directive 2012/19/EU (WEEE). The mark indicates the requirement NOT to dispose of the equipment as unsorted municipal waste, but use the return and collection systems according to local law.
ViewBoard_Cast_button_ENG_1a_20220526
For technical support or product service, see the table below or contact your reseller.
Americas
| Country/Region | Website |
|---|---|
| Canada | https://www.viewsonic.com/us |
| Latin America | https://www.viewsonic.com/la |
| United States | https://www.viewsonic.com/us |
Asia Pacific & Africa
| Country/Region | Website |
|---|---|
| Australia | https://viewsonic.com/au/ |
| Bangladesh | https://www.viewsonic.com/bd/ |
| 中国 (China) | https://www.viewsonic.com.cn |
| 香港 (繁體中文) | https://www.viewsonic.com/hk/ |
| Hong Kong (English) | https://www.viewsonic.com/hk-en/ |
| India | https://www.viewsonic.com/in/ |
| Indonesia | https://www.viewsonic.com/id/ |
| Israel | https://www.viewsonic.com/il/ |
| 日本 (Japan) | https://www.viewsonic.com/jp/ |
| Korea | https://www.viewsonic.com/kr/ |
| Malaysia | https://www.viewsonic.com/my/ |
| Middle East | https://www.viewsonic.com/me/ |
| Myanmar | https://www.viewsonic.com/mm/ |
| Nepal | https://www.viewsonic.com/np/ |
| New Zealand | https://www.viewsonic.com/nz/ |
| Pakistan | https://www.viewsonic.com/pk/ |
| Philippines | https://www.viewsonic.com/ph/ |
| Singapore | https://www.viewsonic.com/sg/ |
| 臺灣 (Taiwan) | https://www.viewsonic.com/tw/ |
| ประเทศไทย | https://www.viewsonic.com/th/ |
| Việt Nam | https://www.viewsonic.com/vn/ |
| South Africa & Mauritius | https://www.viewsonic.com/za/ |
Europe
| Country/Region | Website |
|---|---|
| Europe | https://www.viewsonic.com/eu/ |
| France | https://www.viewsonic.com/fr/ |
| Deutschland | https://www.viewsonic.com/de/ |
| Қазақстан | https://www.viewsonic.com/kz/ |
| Россия | https://www.viewsonic.com/ru/ |
| España | https://www.viewsonic.com/es/ |
| Türkiye | https://www.viewsonic.com/tr/ |
| Україна | https://www.viewsonic.com/ua/ |
| United Kingdom | https://www.viewsonic.com/uk/ |